

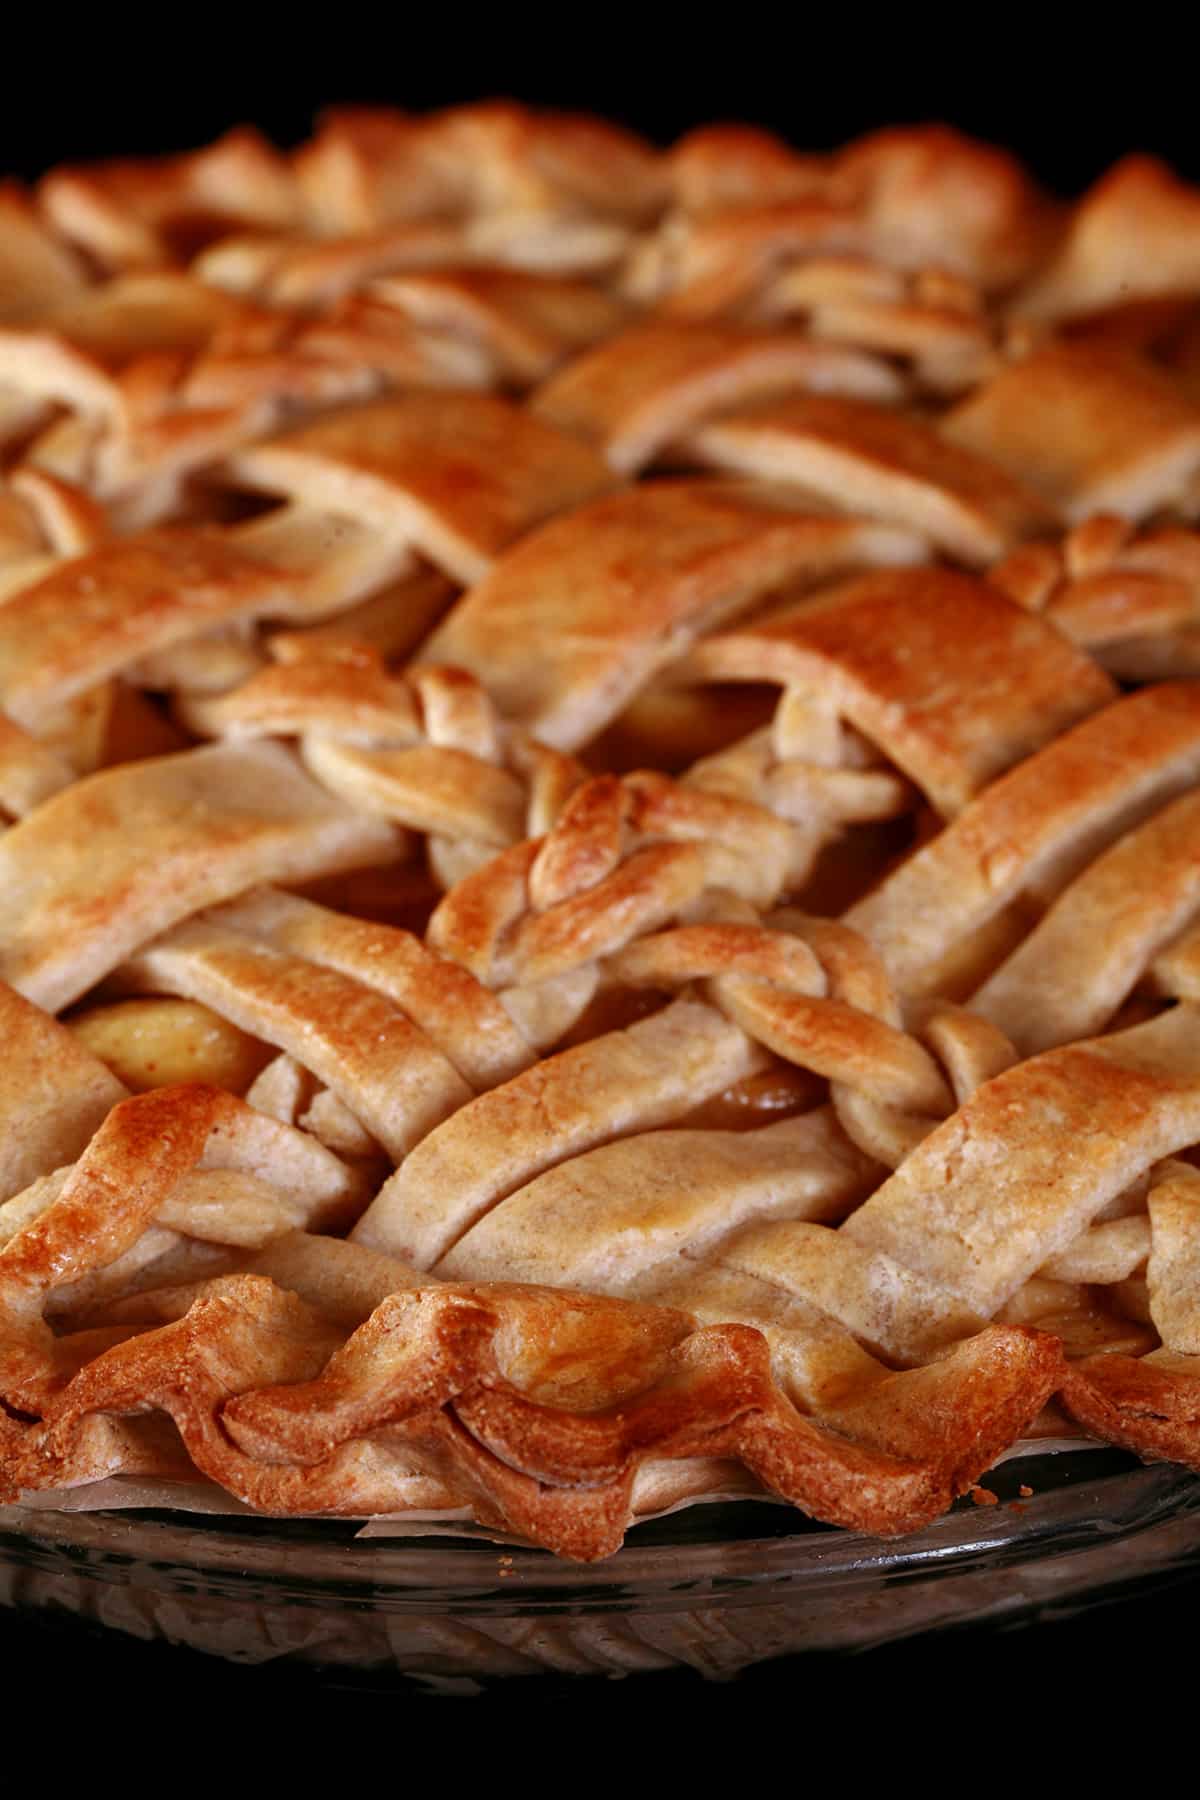
This gluten free pie crust recipe is fantastic - easy to make, handles like a regular pie crust dough, and tastes great! You can even make fancy lattice pies!

I just did a MASSIVE update on my Great Uncle Tom's Perfect Pie Crust (a wheat crust pie), so I think it’s about time to finally post my updated homemade gluten-free pie crust recipe!
Well... two updates, anyway. This is going to be a bit of a weird post.
Gluten Free Cream Cheese Pie Crust
Recently, I did an update to the gluten-free pie crust recipe I’ve been using for about a decade now, with some slight changes to the flours and technique.
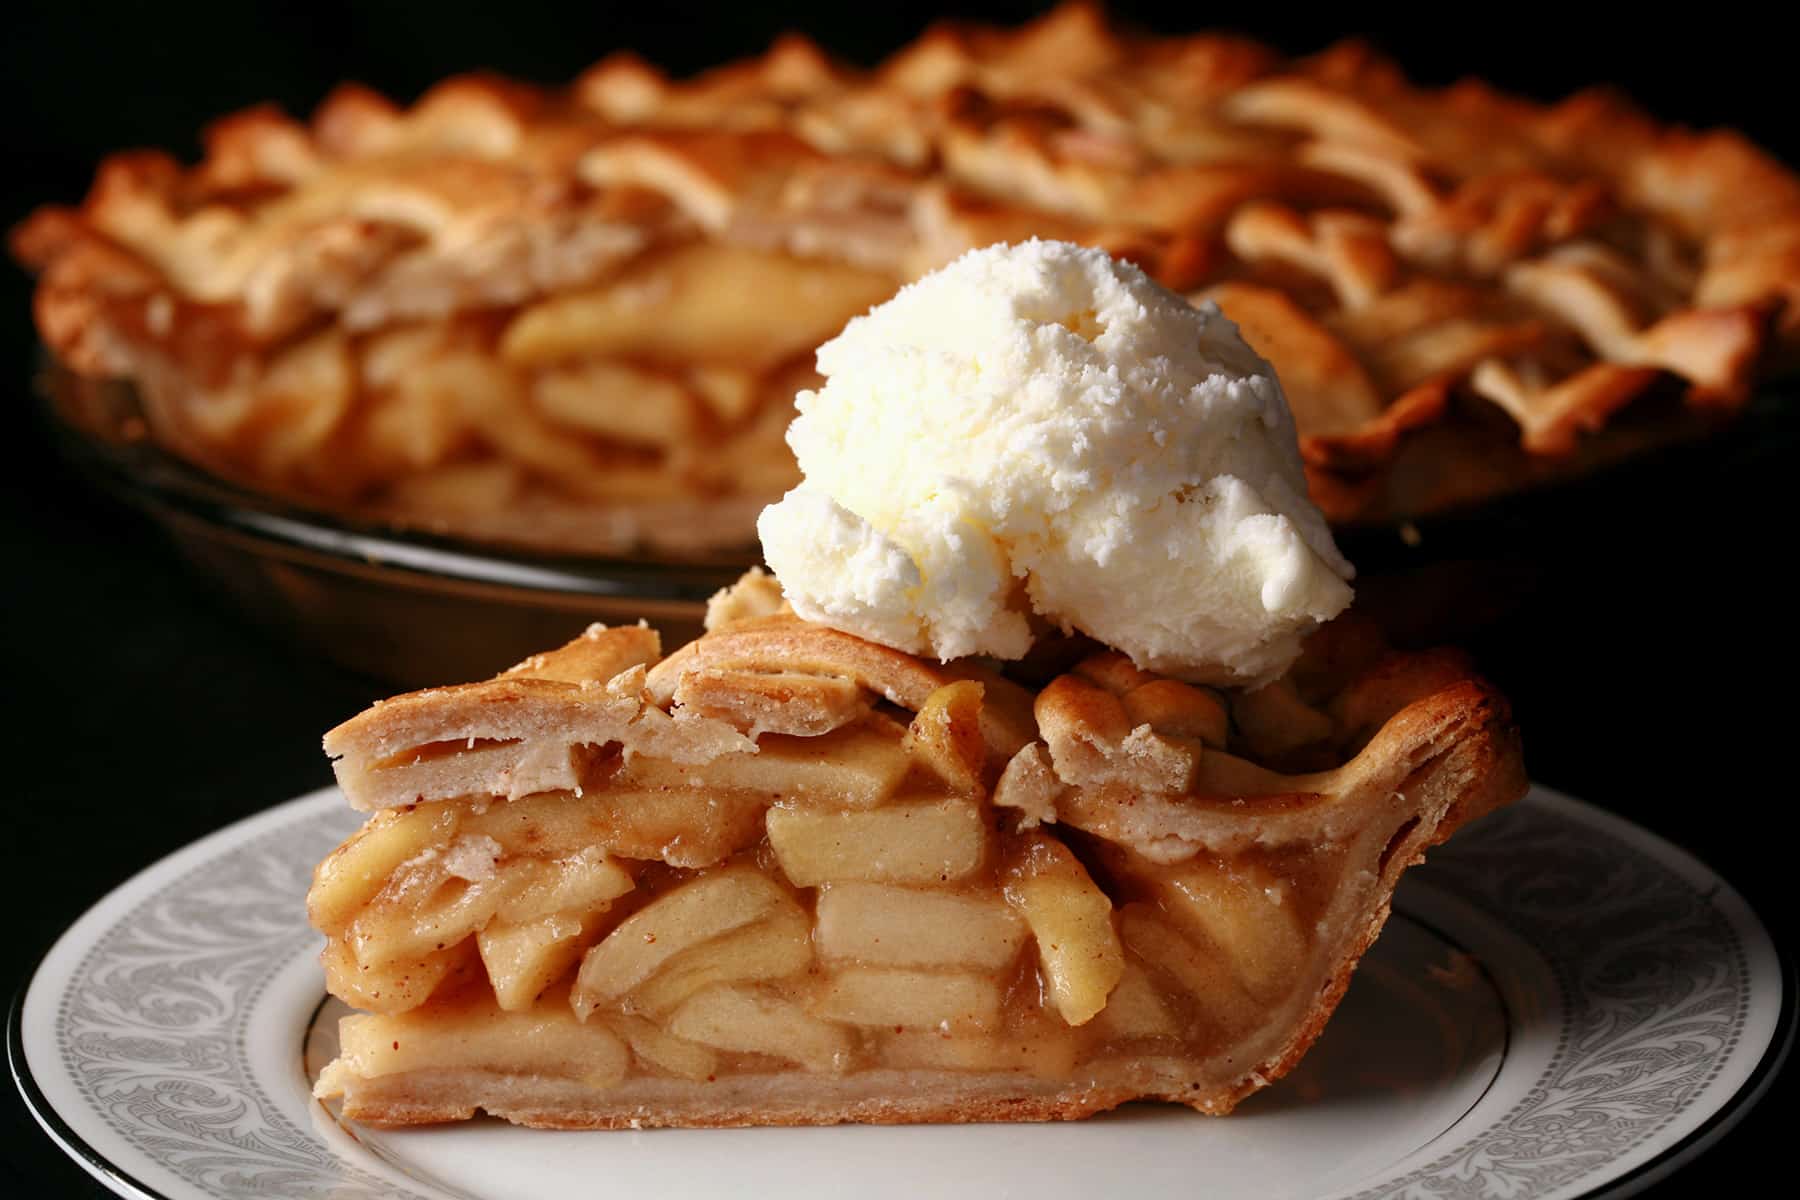
This new gluten-free pie dough uses simple techniques to make a flaky pie crust that bakes up beautifully golden brown.
It’s the perfect gluten free homemade pie crust - easy to make, easy to handle, tasty ... all on top of producing that nicely flaky crust.
If handled properly, of course. (More on that in a bit!).
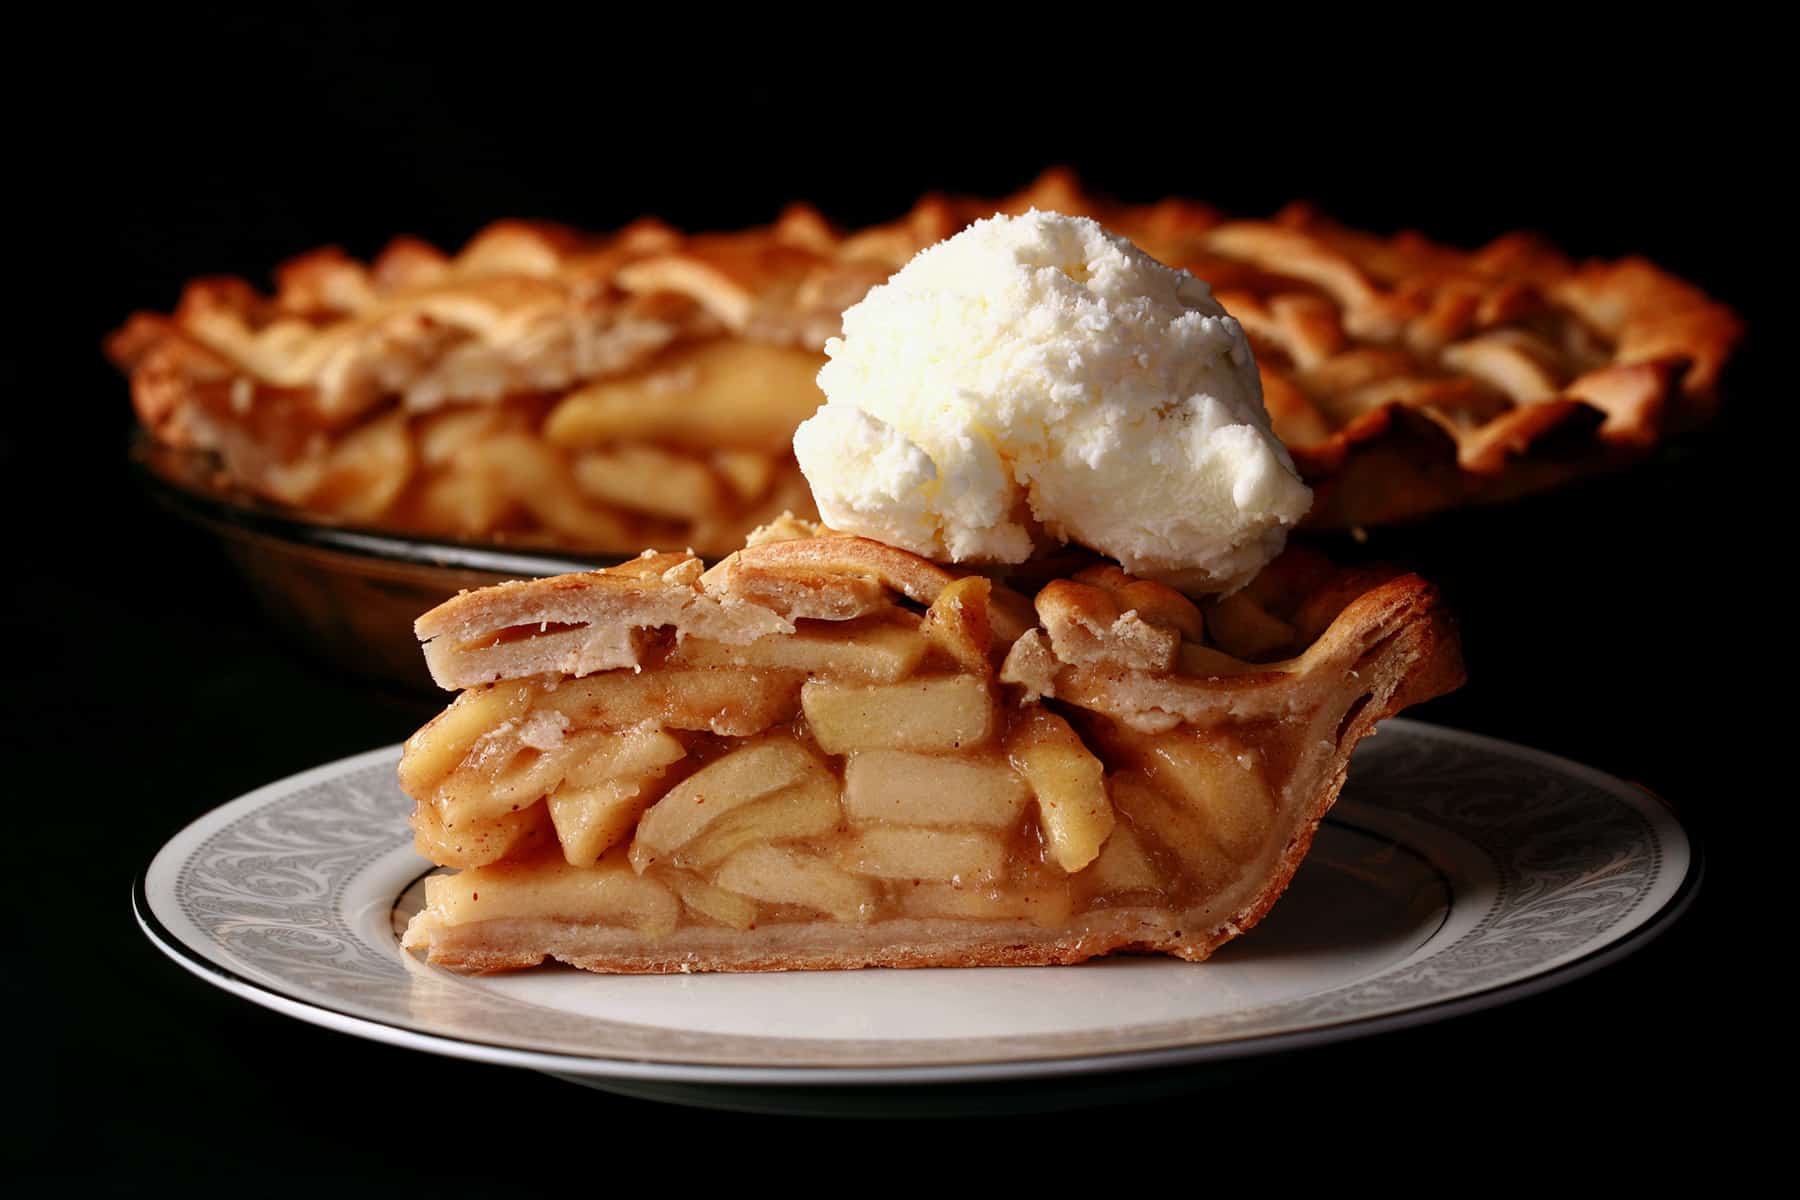
Note: This is the recipe pictured in the lattice / apple pie photos throughout this post.
Gluten Free Perfect Pie Crust
Of course, I’m not one to leave well enough alone, and wondered what would happen if I used my flours/etc, but brought it more in line with my uncle’s Perfect Pie Crust recipe.
... and it turned out a crust that was even flakier than my cream cheese gluten free pie crust!
Note: This is the recipe pictured in the Pumpkin pie photos in this post.
So, I had a bit of a conundrum - which do I use?
The “perfect pie crust” variation is nothing at all like my original pie crust recipe, so I could see people being annoyed if I get rid of the original entirely.
That said, it’s ALSO a really great pie crust recipe, so I should definitely put it out there.

Gluten Free "Perfect Pie Crust" - Super flaky!
Two Pie Crusts, One Post!
SO. What’s the difference, and which should you use?
Both are fantastic.
The Cream Cheese Pie Crust is a bit more solid / less flaky, with a richer taste, and it’s easier to work with.
The Perfect Pie Crust is much flakier - definitely passing for a regular pie crust - but it’s also a bit more delicate to work with.
While both make fantastic pie crusts, I prefer using the cream cheese one for fussier work, like tarts, turnovers, braiding, etc - it’s more forgiving to work with.
If you aren’t experienced with making pie crusts, I’d recommend using the cream cheese one.
This post was written about the cream cheese crust. Most of what’s said about it - aside from the fat used and the techniques - apply to the “perfect pie crust” version as well.
I am tacking on the new recipe walk-through at the very end of this post, as text and photos. I’ll have them both in the recipe card - just be careful to follow the directions for the set of ingredients you’re using!
(Unfortunately, I can only use one recipe card per post).
Hopefully this isn’t too messy of a solution!

The New GF Pie Crust Recipes
I spent a long time tweaking that original cream cheese gluten-free dough recipe, and it’s now a lot closer to being a gluten free version of Uncle Tom’s homemade pie crust.
Kind of a halfway point between the two - more of the technique I use for traditional pie crusts, while using most of the ingredients I used for my original easy gluten-free pie crust.
Sometimes, developing gluten-free recipes means getting creative with ingredients, and that’s the case here - cream cheese isn’t usually something you see in pie crust making.
With this cream cheese gf crust, though, it brings a bit of fat, protein, AND flavour, all in one. It helps act as a bit of a binder, strengthening the dough - something that gluten normally does.
That strength is important, as it allows the structure of the dough to hold up around the its of fat. As that felt melts during the baking, the moisture turns to steam, and that flaky crust can be formed!
While regular wheat flour makes regular crusts hold together, developing the gluten in the crust is actually a bad thing - you actively have to work against it.
When making gluten free crust, you’re aiming to get dough to act MORE like gluten-flour dough!
... and I find that hilarious.
Anyway, LOTS to get to, so let’s do so.

Ingredients
While the original recipe was made from the most simple ingredients, this one needs a few more to work. You should still be able to find most of them in your local grocery store.
This recipe is enough to make 2 single-crust pies, or one double-crust pie
Flour Mixture
As with all of my gluten-free baking, I do NOT use all purpose gluten free flour blends when making pies.
The best gluten-free flour blend, IMHO, will always be the one that was designed specifically for the recipe it’s being used for.
While regular all purpose flour has a wide range of abilities and uses - it’s wildly forgiving - the same can’t really be said of the GF blends.
When you use the right ingredients for a particular recipe - taking flavour, properties, and outcome into account - it makes all the difference.
White Rice Flour (can sub Brown Rice Flour)
Light Buckwheat Flour
Sorghum Flour
Sweet Rice Flour
Corn Starch (Can sub Potato Starch)
Xanthan Gum
The Cold Fat
In this recipe, we actually have 3 sources of fat - and they all perform slightly different tasks.
The cream cheese is finely blitzed into the flour mixture, to evenly distribute fat throughout and help with structure. It does NOT melt or cause air pockets.
The cold unsalted butter is used in the traditional way. Small pieces of cold butter are dispersed throughout the dough to melt, steam, and cause air pockets.
Finally, the egg helps a little with fat content, but also brings structure and moisture.
Everything Else
Rounding out this recipe, we have:
2 tablespoon Packed Brown Sugar
Salt
Cold Water
No real notes there, aside from “actually use really cold water”.
You want to prevent softening the butter as much as possible, and room temperature water does not help you!

Equipment
Aside from bowls and measuring implements, you’ll only need a few really basic pieces of equipment to make this homemade pie crust recipe:
Rolling Pin
While any rolling pin will do - and I used to make this with a wooden one that was at least a couple decades old.
I now use a Rolling pin with adjustable thickness guides, and love it - that link goes to the one I have.
Not only is it perfect for getting a perfectly even roll to exactly the thickness I want - ⅛"- it also comes with a silicone mat that is super handy for rolling it out on.
I use the round templates on it not only for rolling the dough out, but for tracing a parchment circle out - more on that in a bit, though!
Pastry Blender
When making the second version (non-cream cheese version) of this pie crust recipe, I recommend having a pastry cutter.
This is what’s used to cut the lard into the flour mixture, distributing small pieces of fat throughout the dough.
Honestly, this is fairly optional. I use a potato masher now, and I’ve been known to use a couple of forks, on occasion. It’s all good.
Pie Plate
Go with whatever your pie recipe is calling for, but generally speaking you’re going to want a 9-inch pie pan
I find that pies cook more evenly and bake up nicer in glass pans, so I ended up getting rid of my metal pie plates. I use a glass pie dish whenever I make pies now
And, on a shallow food blogger note, they look nicer in photos, LOL!
How to Make the Best Gluten-Free Pie Crust - Cream Cheese Version
The full recipe is in the recipe card at the end of this post, here is the pictorial walk through.
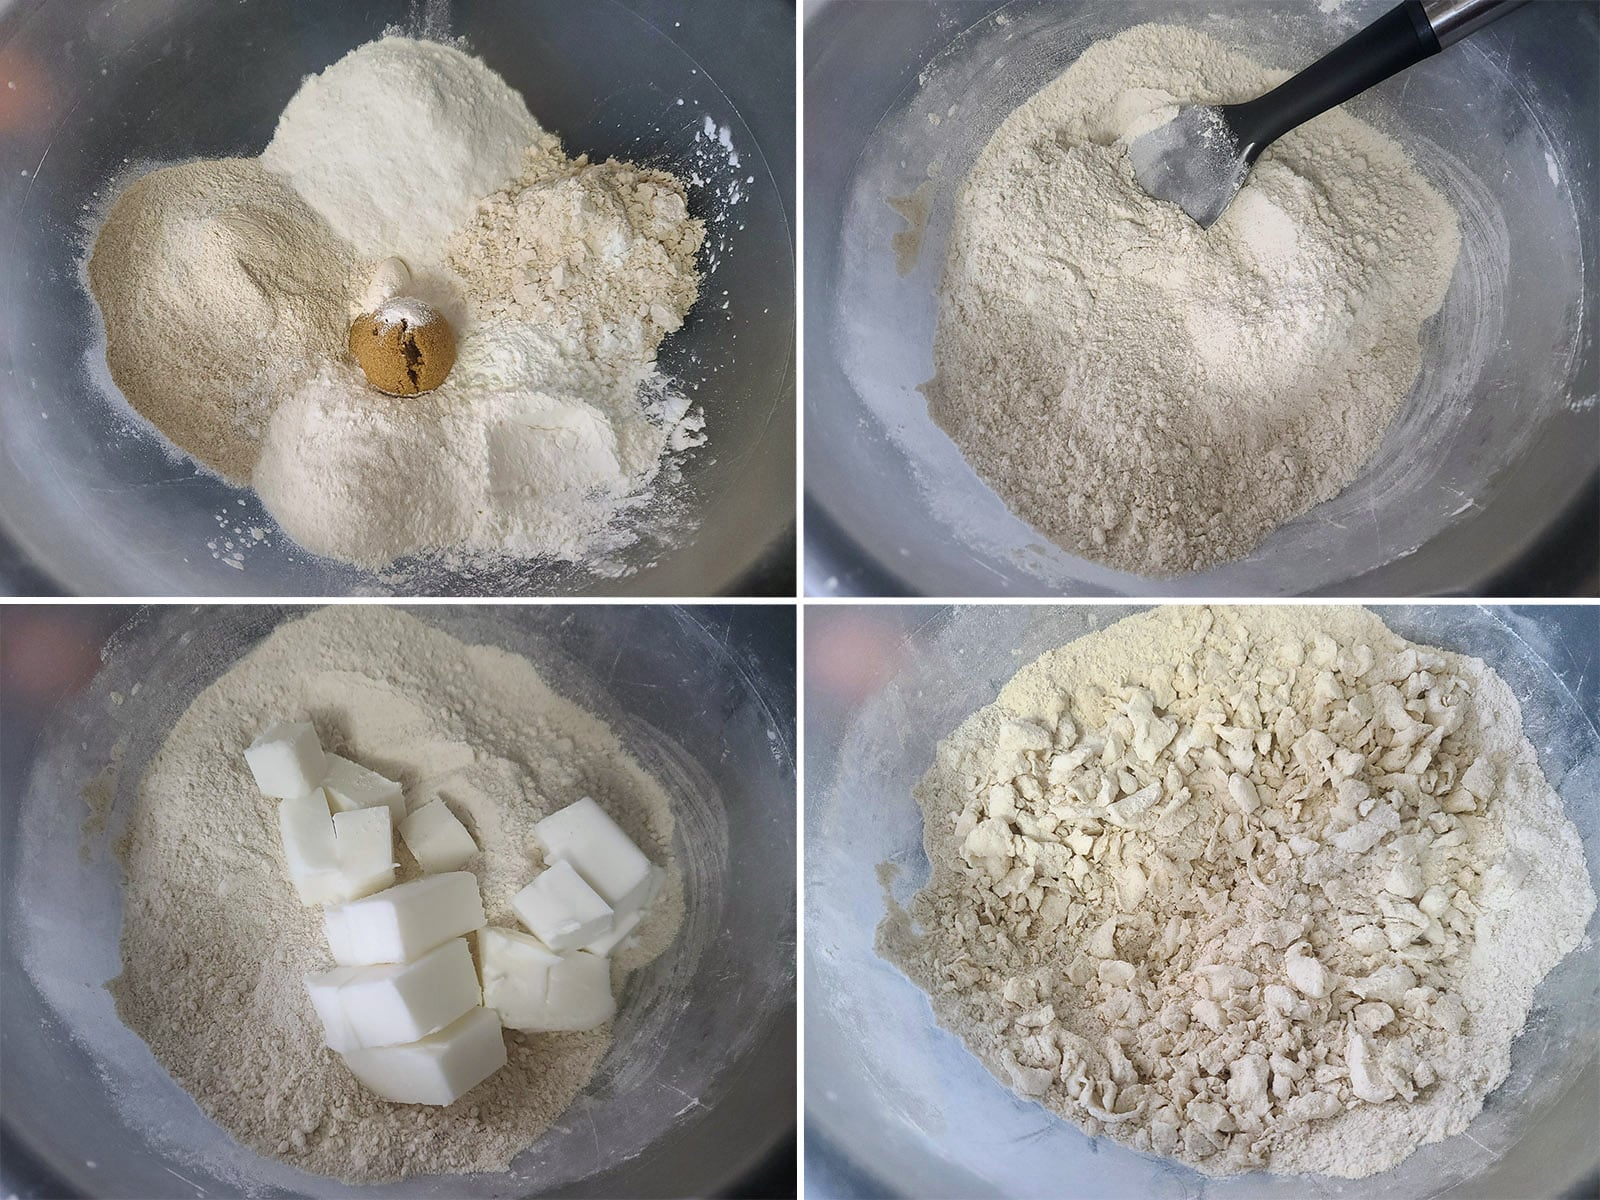
Measure flours, corn starch, brown sugar, xanthan gum, and salt into the bowl of your food processor, blitz to combine.
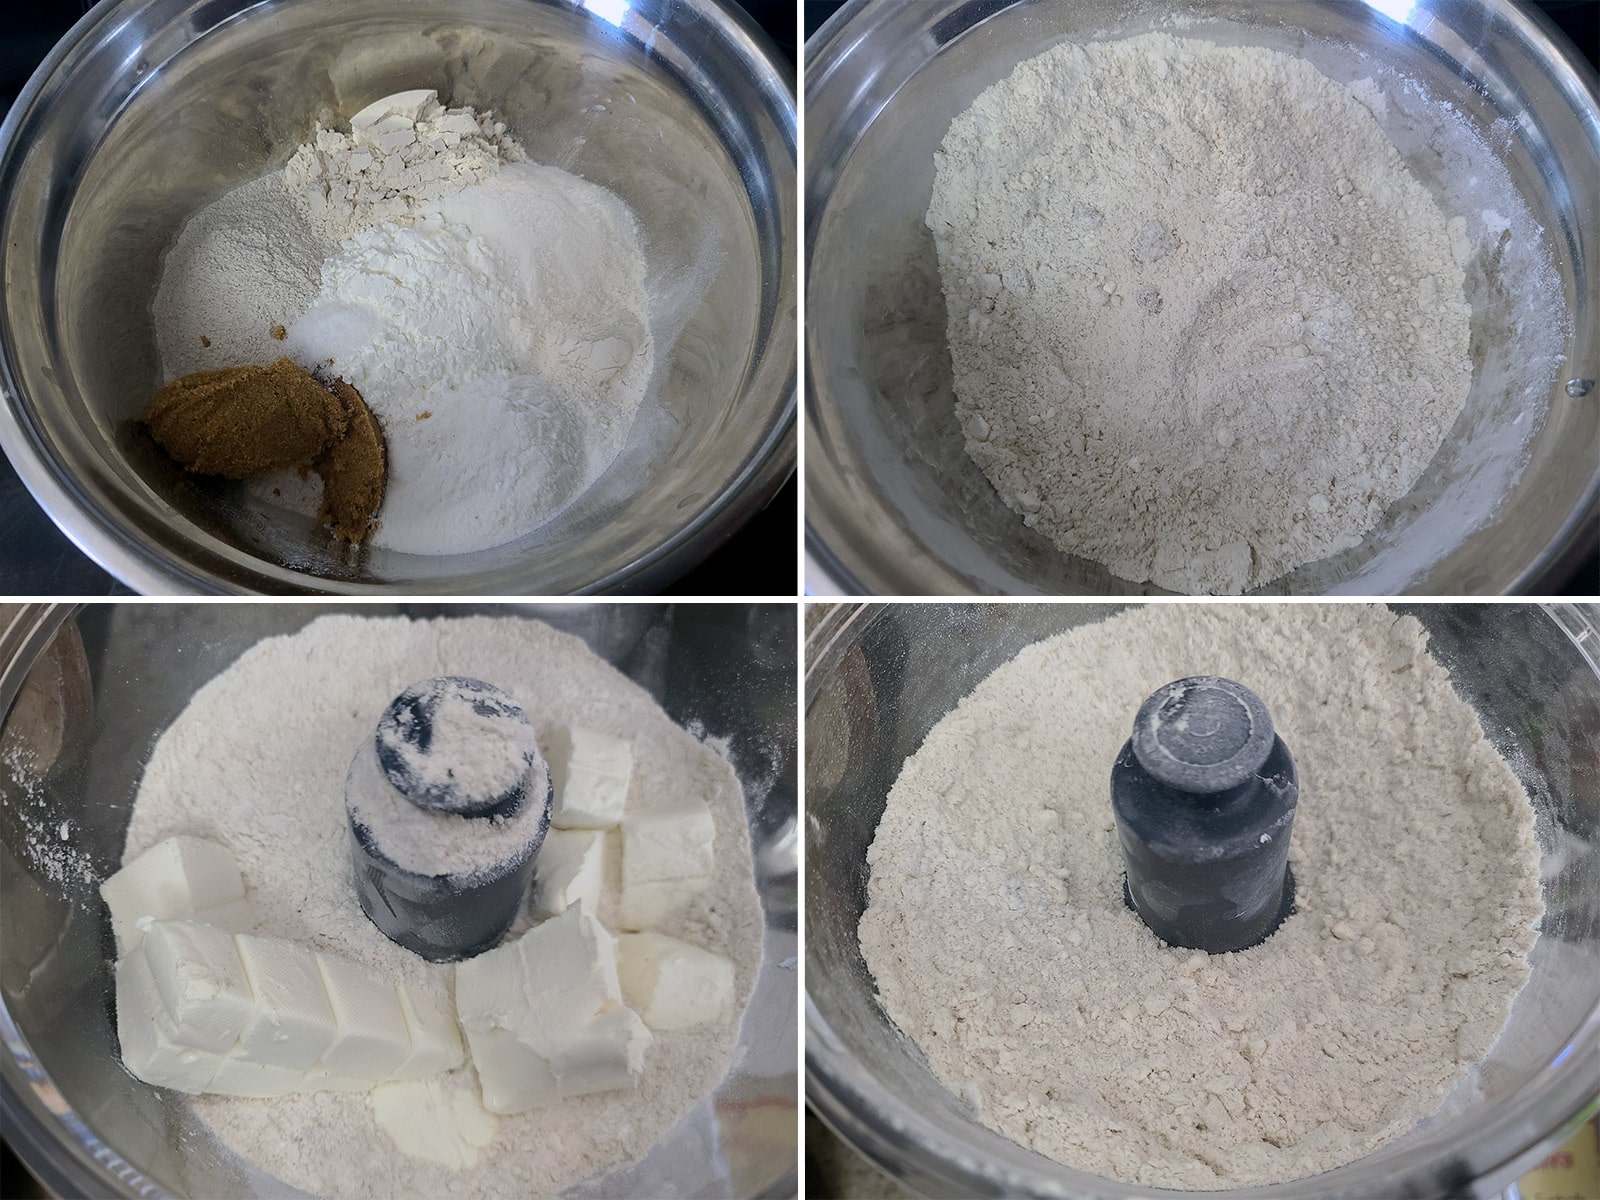
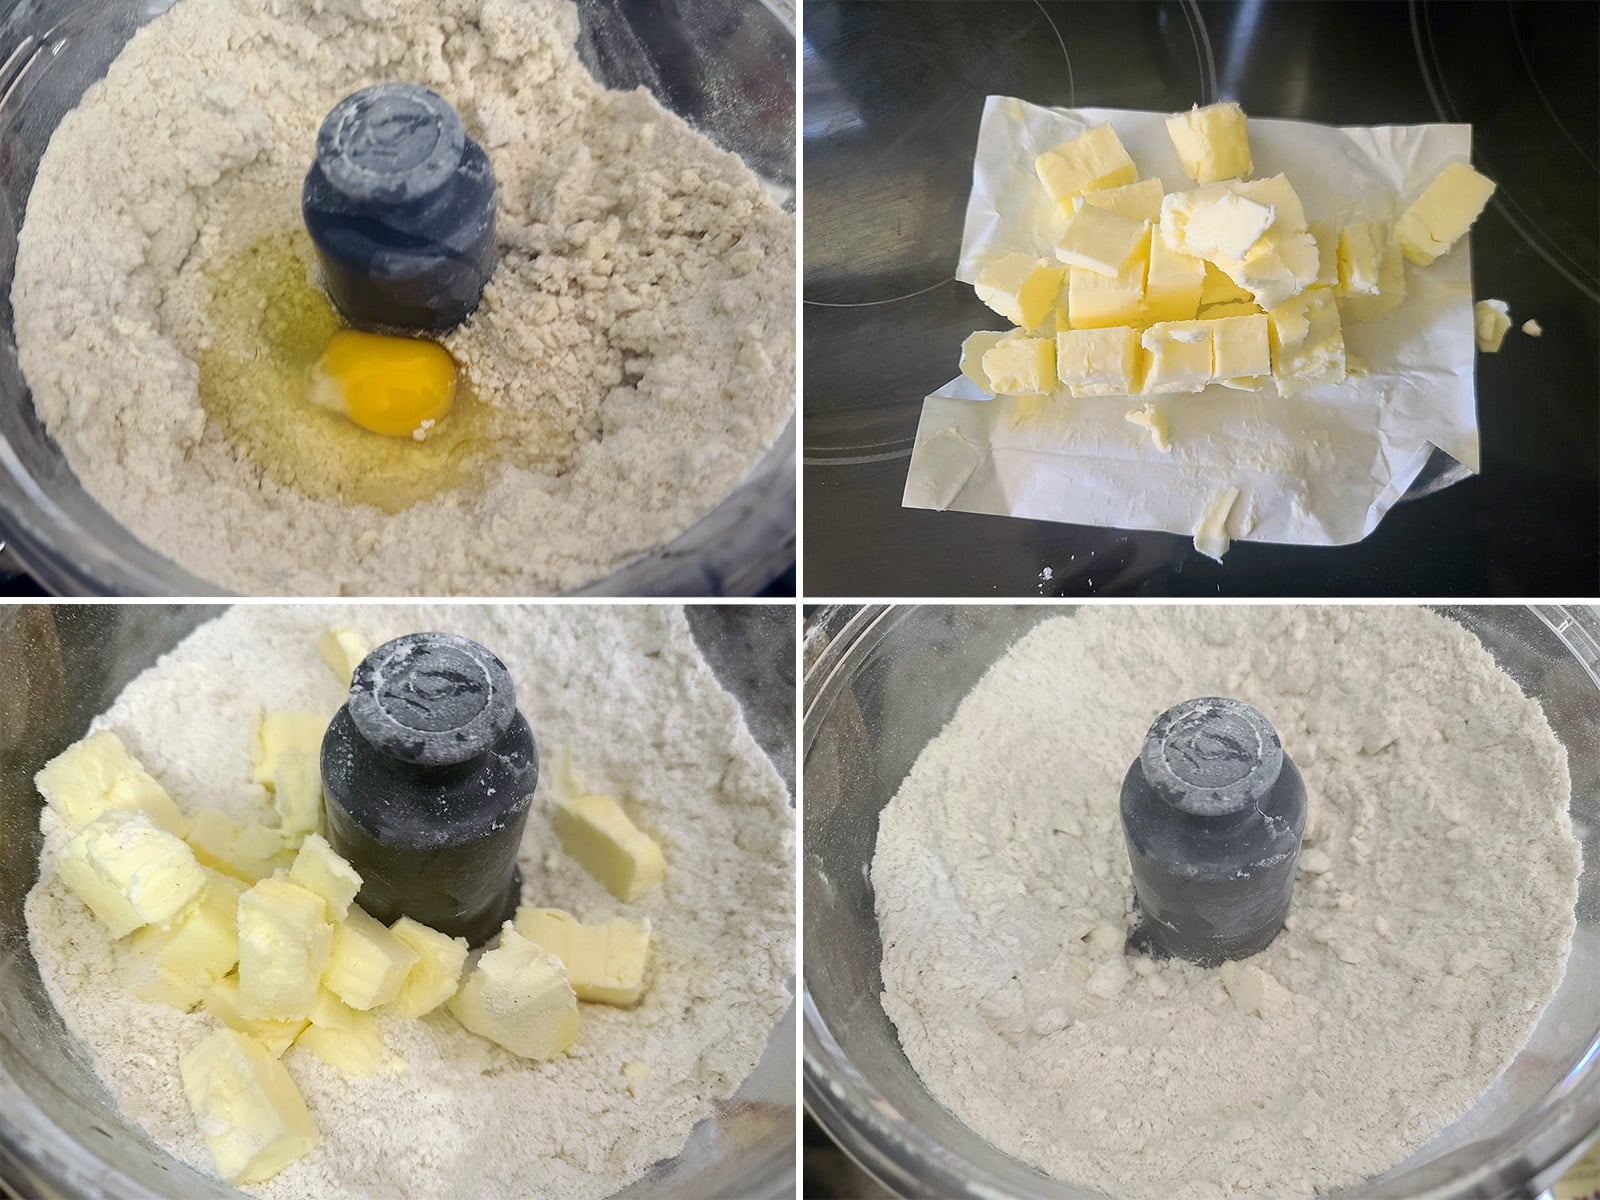
Add the pieces of butter, ⅓ cup ice water, and egg. Blitz a few more times - just long enough to start to bring it together as a dough – you may need to use a little more water. Do NOT over-process it!
Note: If you’re worried about overdoing it, you can transfer the mixture to a large bowl after blitzing the cream cheese in.
Then, add the cold butter, cut it in with a pastry blender, and stir the water/egg in with a spatula or wooden spoon.
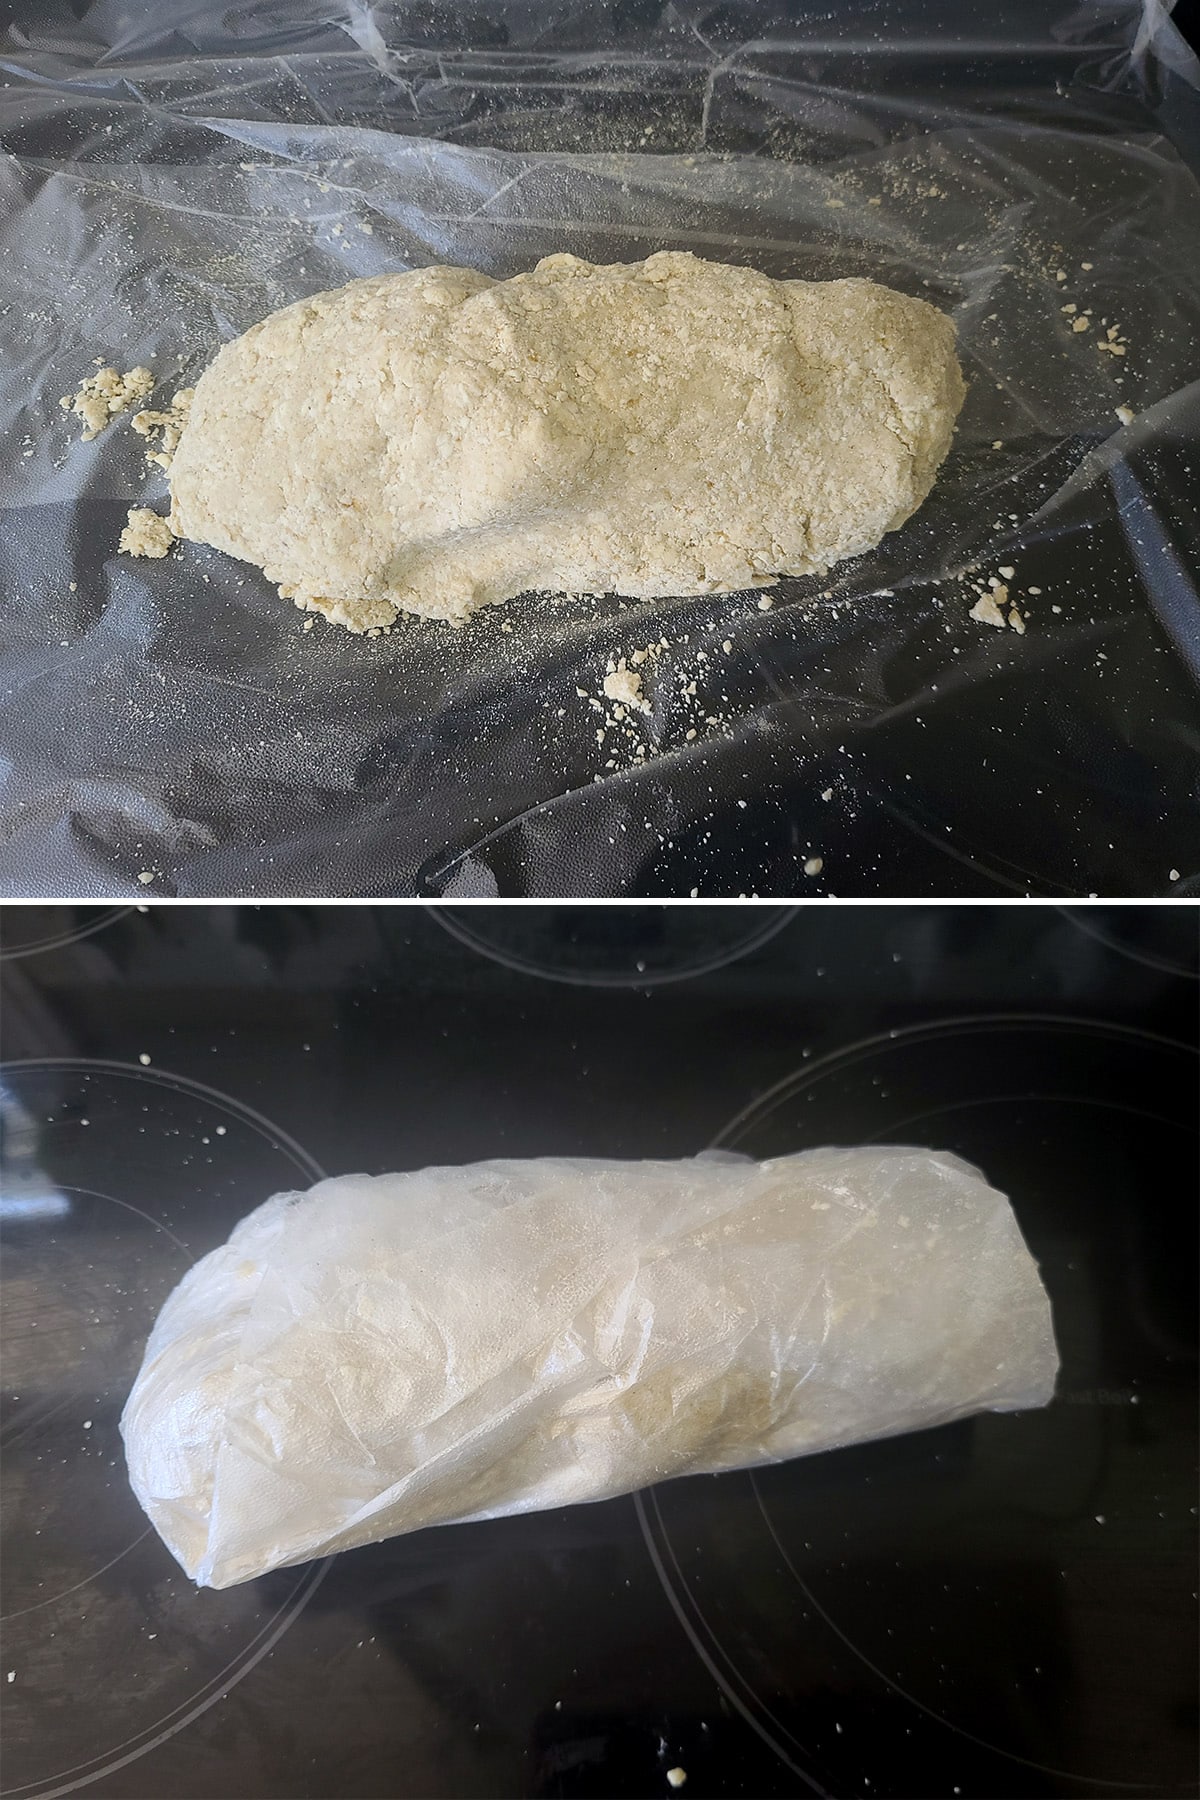
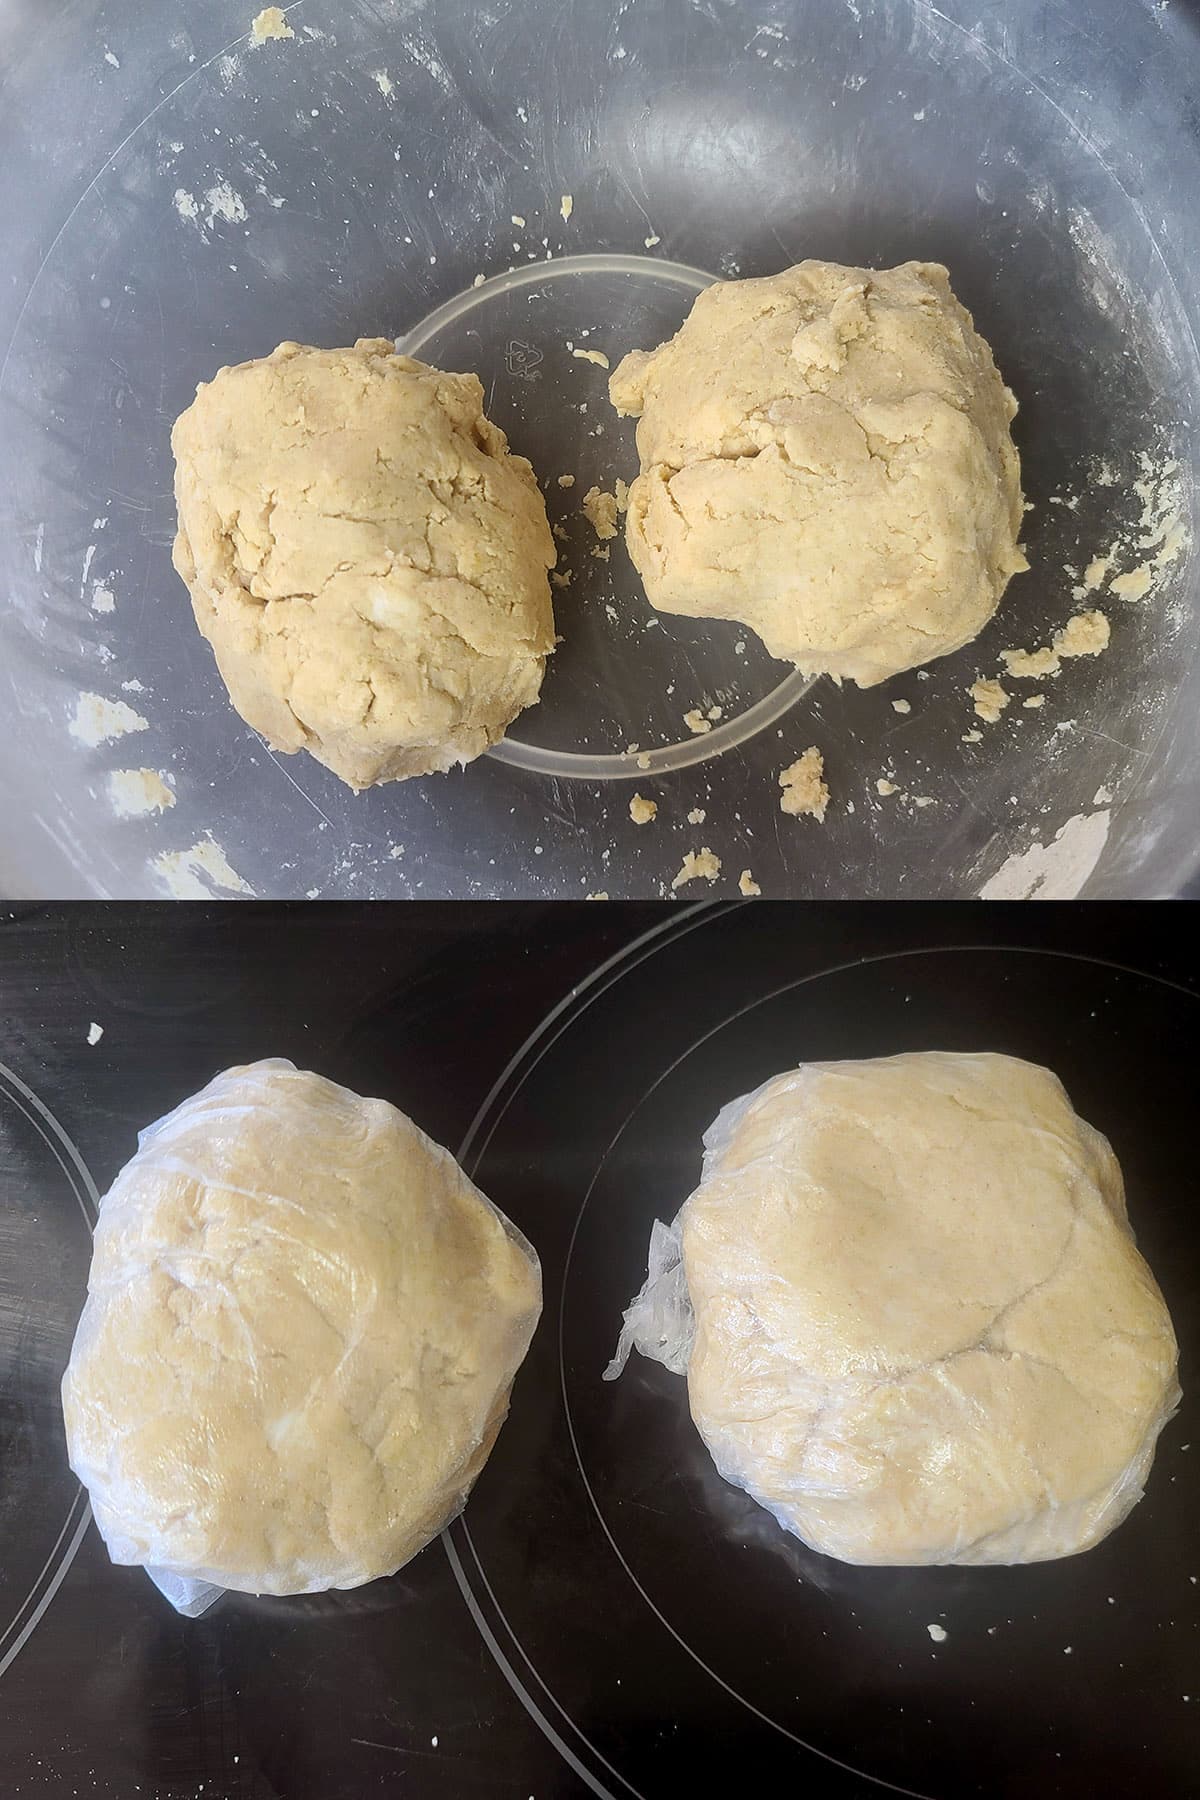
Remove dough from processor, knead lightly to bring it together as a ball.
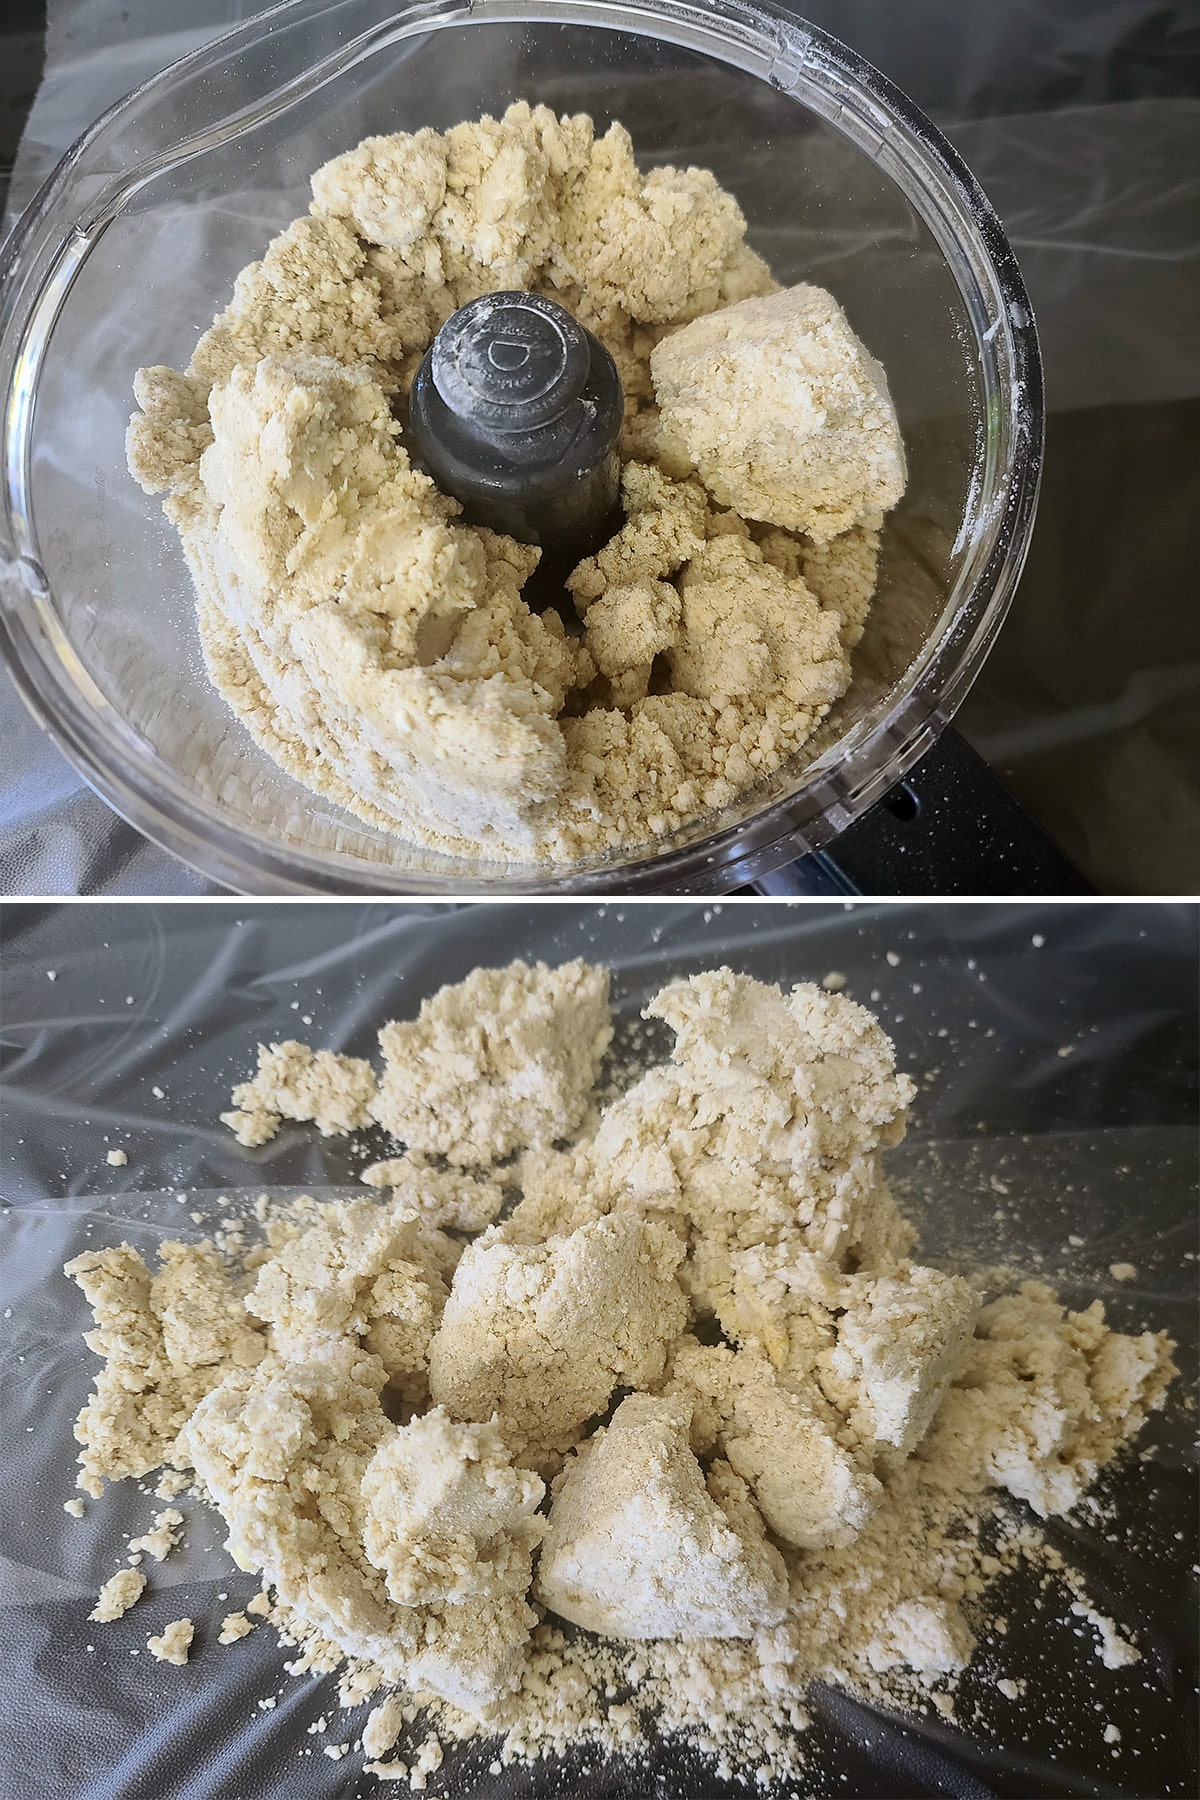
Wrap dough ball in plastic wrap, chill for 1 hour before use.
Divide dough in half before using - recipe makes 2 single crust pies, or 1 double crust pie.
How to Use Gluten Free Pie Crusts
Single Crust Pie
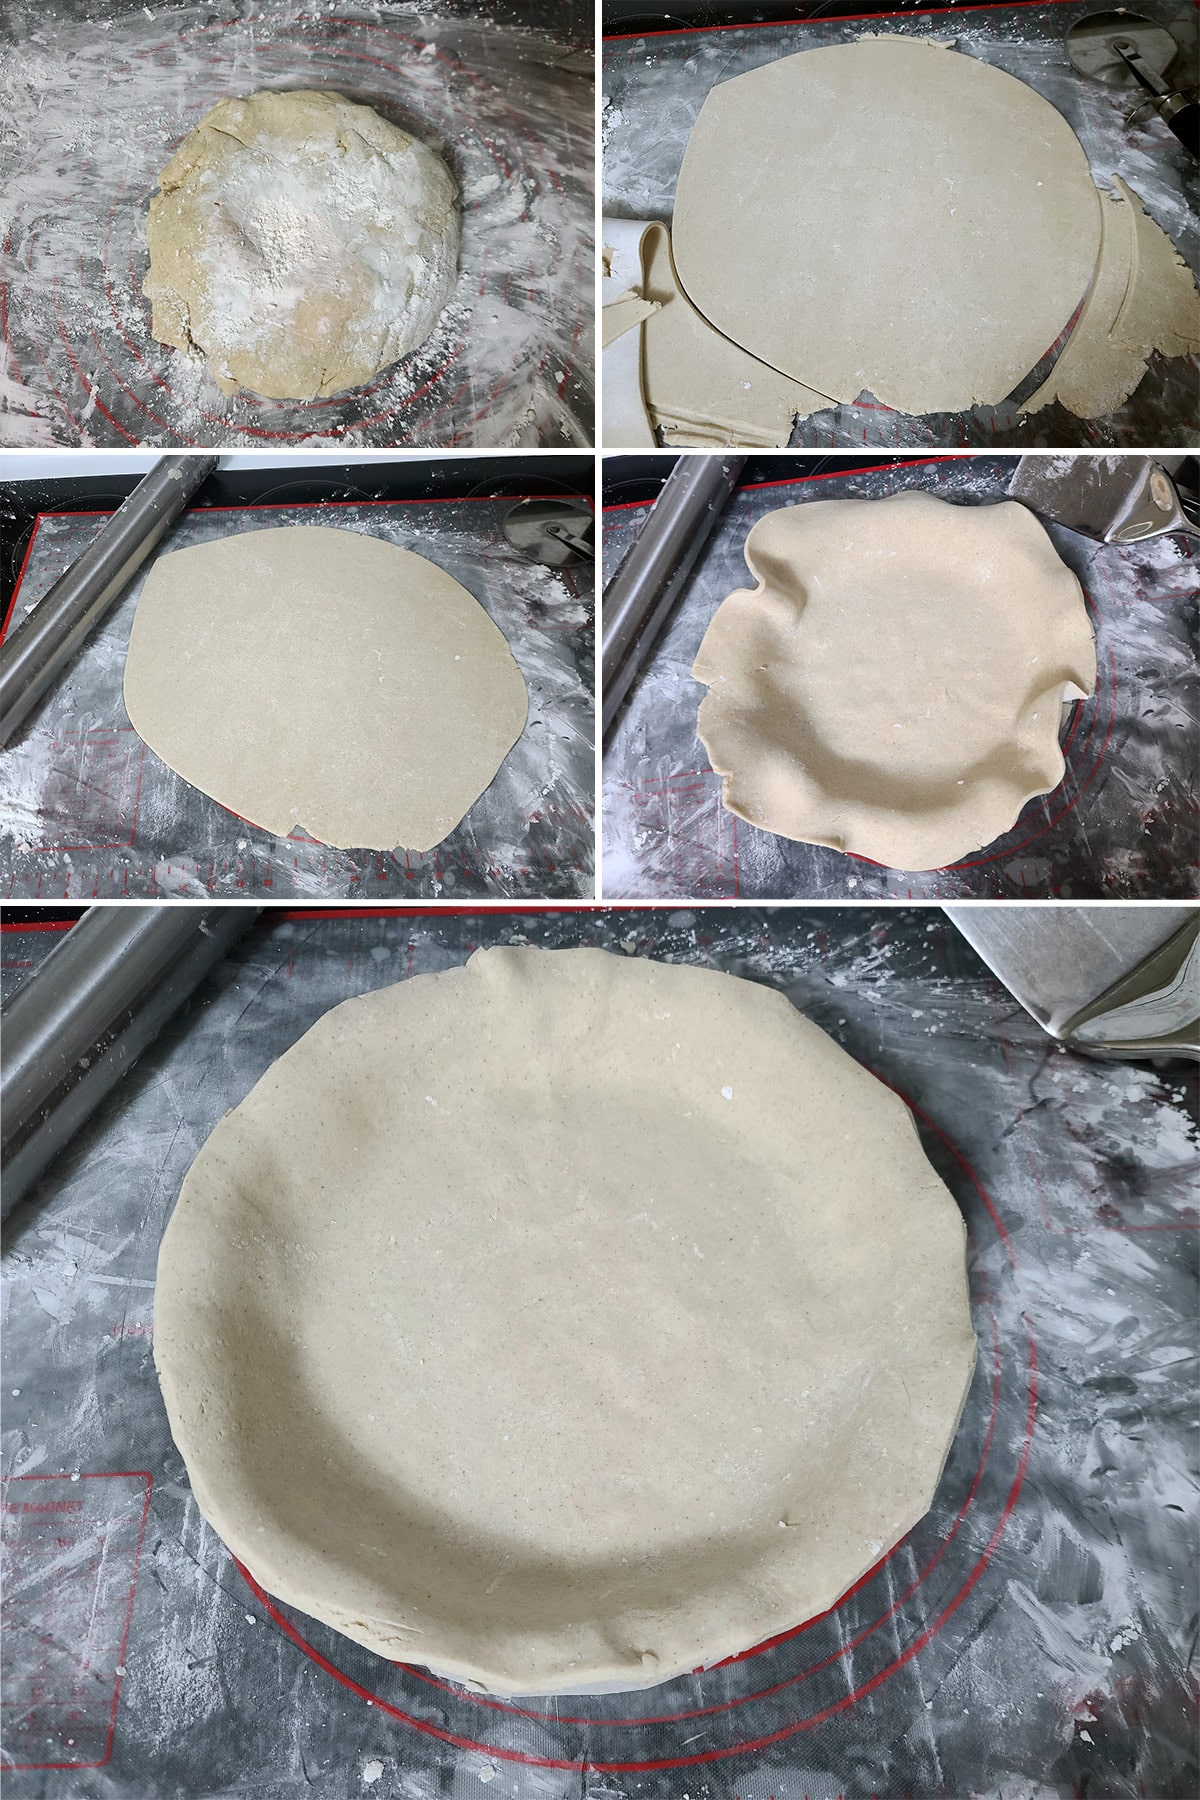
Assuming you’re using a standard pie dish, roll your crust out to ⅛" inch thick. For a 9" pie pan, you’ll want the dough rolled out to a diameter of at least 12".
Carefully transfer the rolled dough to your pie plate, centering it as best you can - again, try to avoid stretching the dough.
Gently fit the dough into the bottom edge of the pan - without stretching - and smooth everything out.
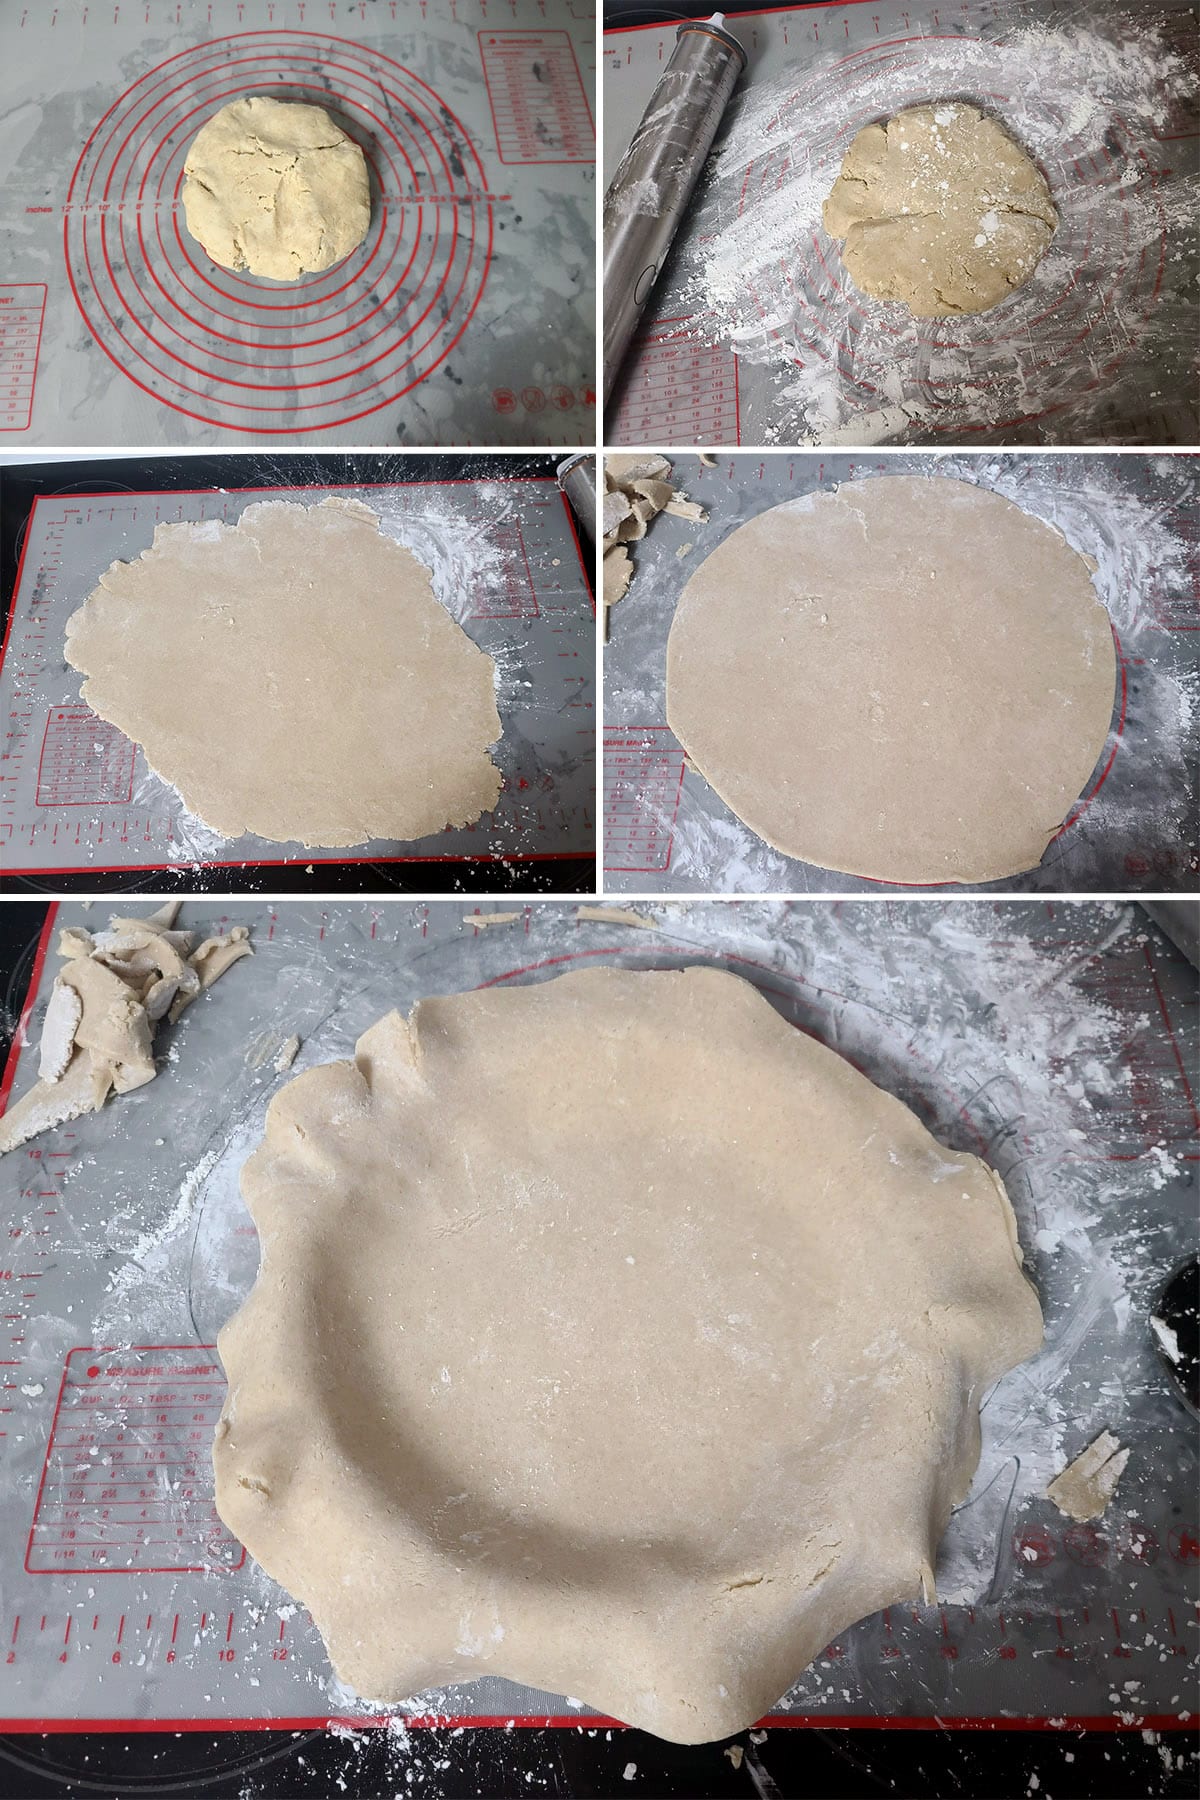
Fold the very edge of the crush under itself, the whole way around. Aim to basically fold the actual overhang in half.

Fill with your pie filling, and bake as instructed in the recipe you’re using.
Double Crust Pie
There are two main ways to make a double crust pie: A solid top crust, and a constructed top crust.
Whichever way you’re going with, follow the “Single Crust Pie” instructions for the bottom crust, up to the point of trimming the excess.
After your oven is preheated, transfer your chilled pie filling to the lined pie plate, set it in the fridge while you work on the top crust.
Roll out your second crust to ⅛ inch thick.
Solid Top Crust
Take your filled pie out of the fridge.
Carefully center your second crust over the prepared pie filling.
Trim the top crust to about a ¾" overhang. Fold the edge of the upper crust under - encasing the edge of the bottom crust.
Flute the crust as desired, brush the top of the pie with egg wash (info below).
Use the tip of a sharp knife to cut a few vents into the pie crust, to let the steam escape.
Constructed Top Crust
This category of pie includes all manner of lattice top pies, layered shapes, etc.
Cut the rolled out second crust as you need for your intended design - strips for lattice, whatever shapes you’re doing, etc.
Take your filled pie out of the fridge, lay out your upper crust pieces however you need them.
Trim the top crust pieces to about a ¾" overhang. Fold the edge of the upper crust pieces under - encasing the edge of the bottom crust.
Flute the crust as desired, brush the top of the pie with egg wash (info below).
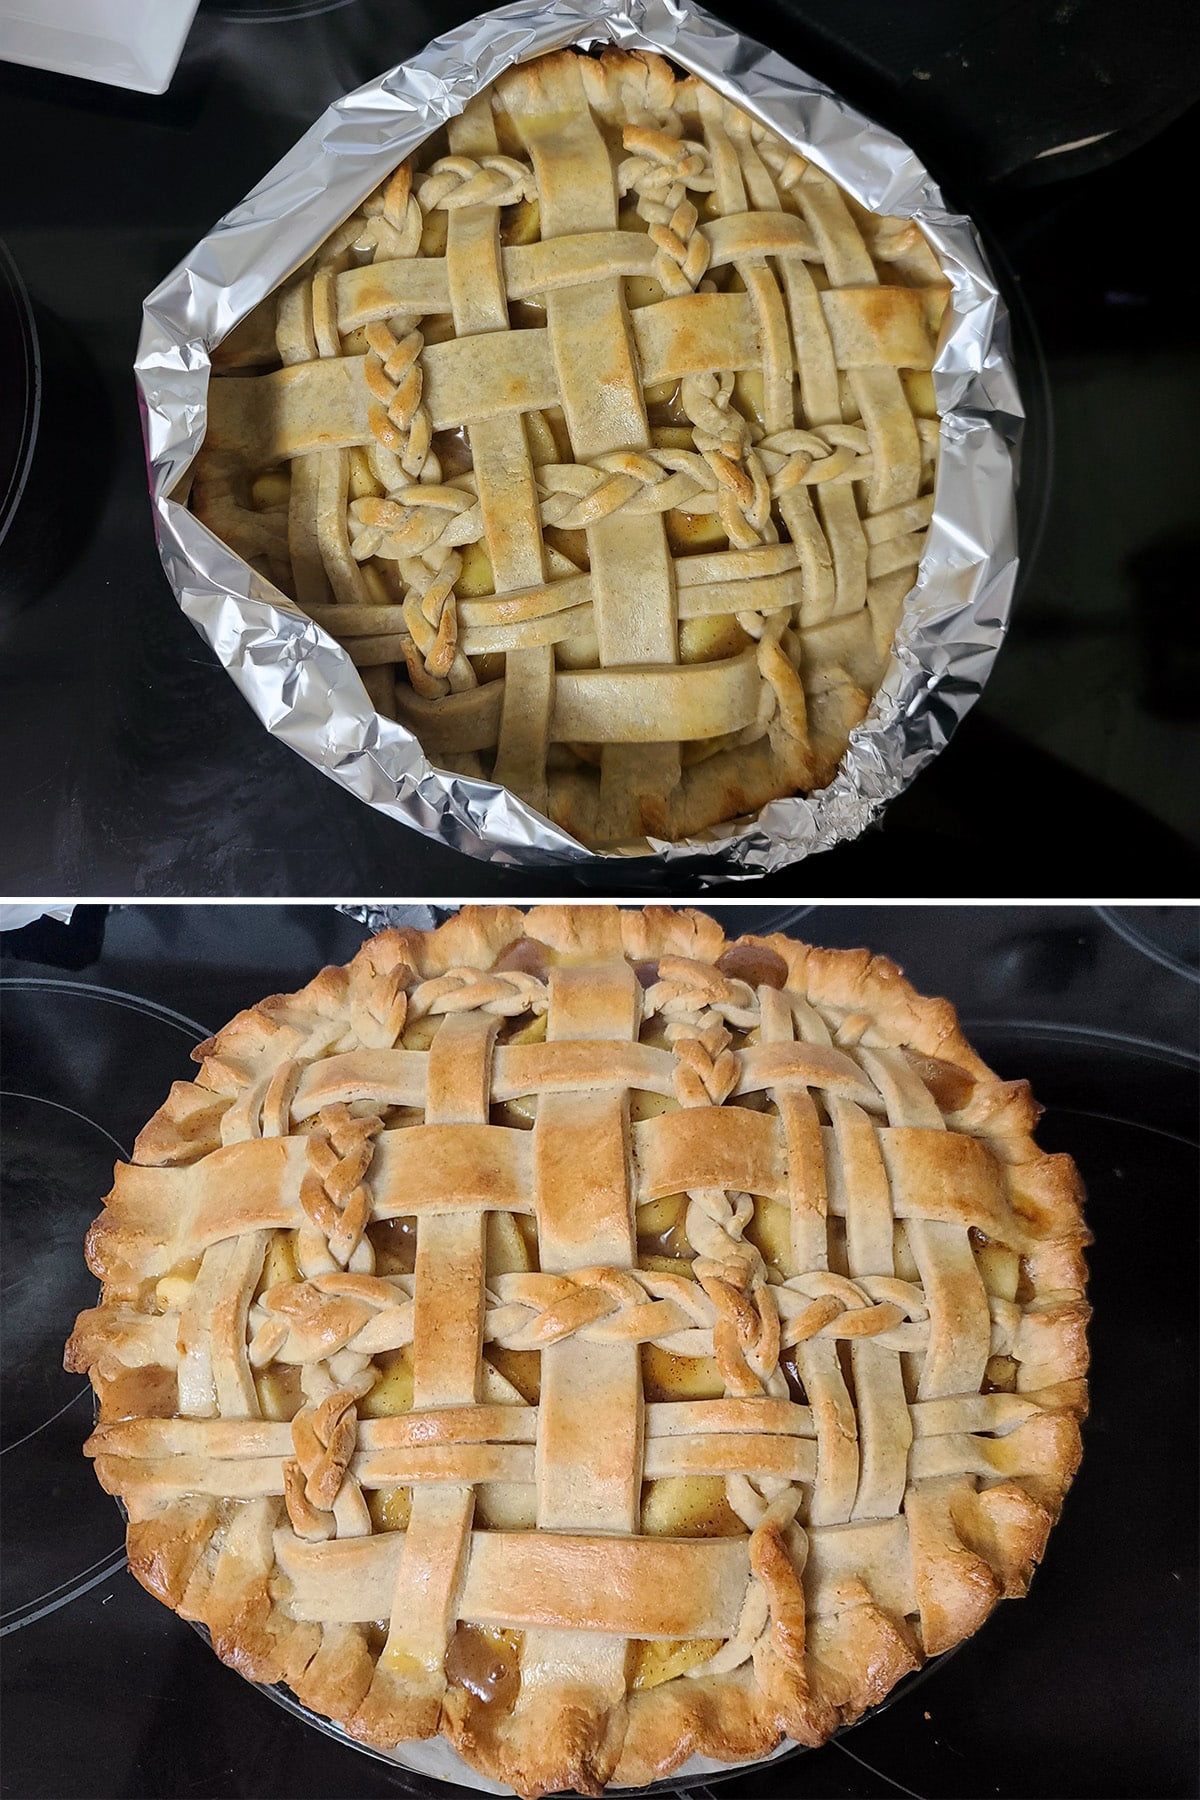
Lattice Top Pies
As a quick guide, here’s how I do lattice top pies:
Lay out one set of strips across the pie filling. Fold every second strip back, at the halfway point.
Place a new strip of pie dough across the pie, basically centered - close to the fold point.
Set each of the folded back strips back to their starting points, taking care not to stretch them.
Fold back every second strip of crust, but this time do the ones you didn’t fold back the first time.
Repeat these steps - alternating which strips are folded back - until you reach the far end of the pie.
Then, turn the pie around and repeat the steps from the beginning, to finish out the lattice on the other half of the pie:

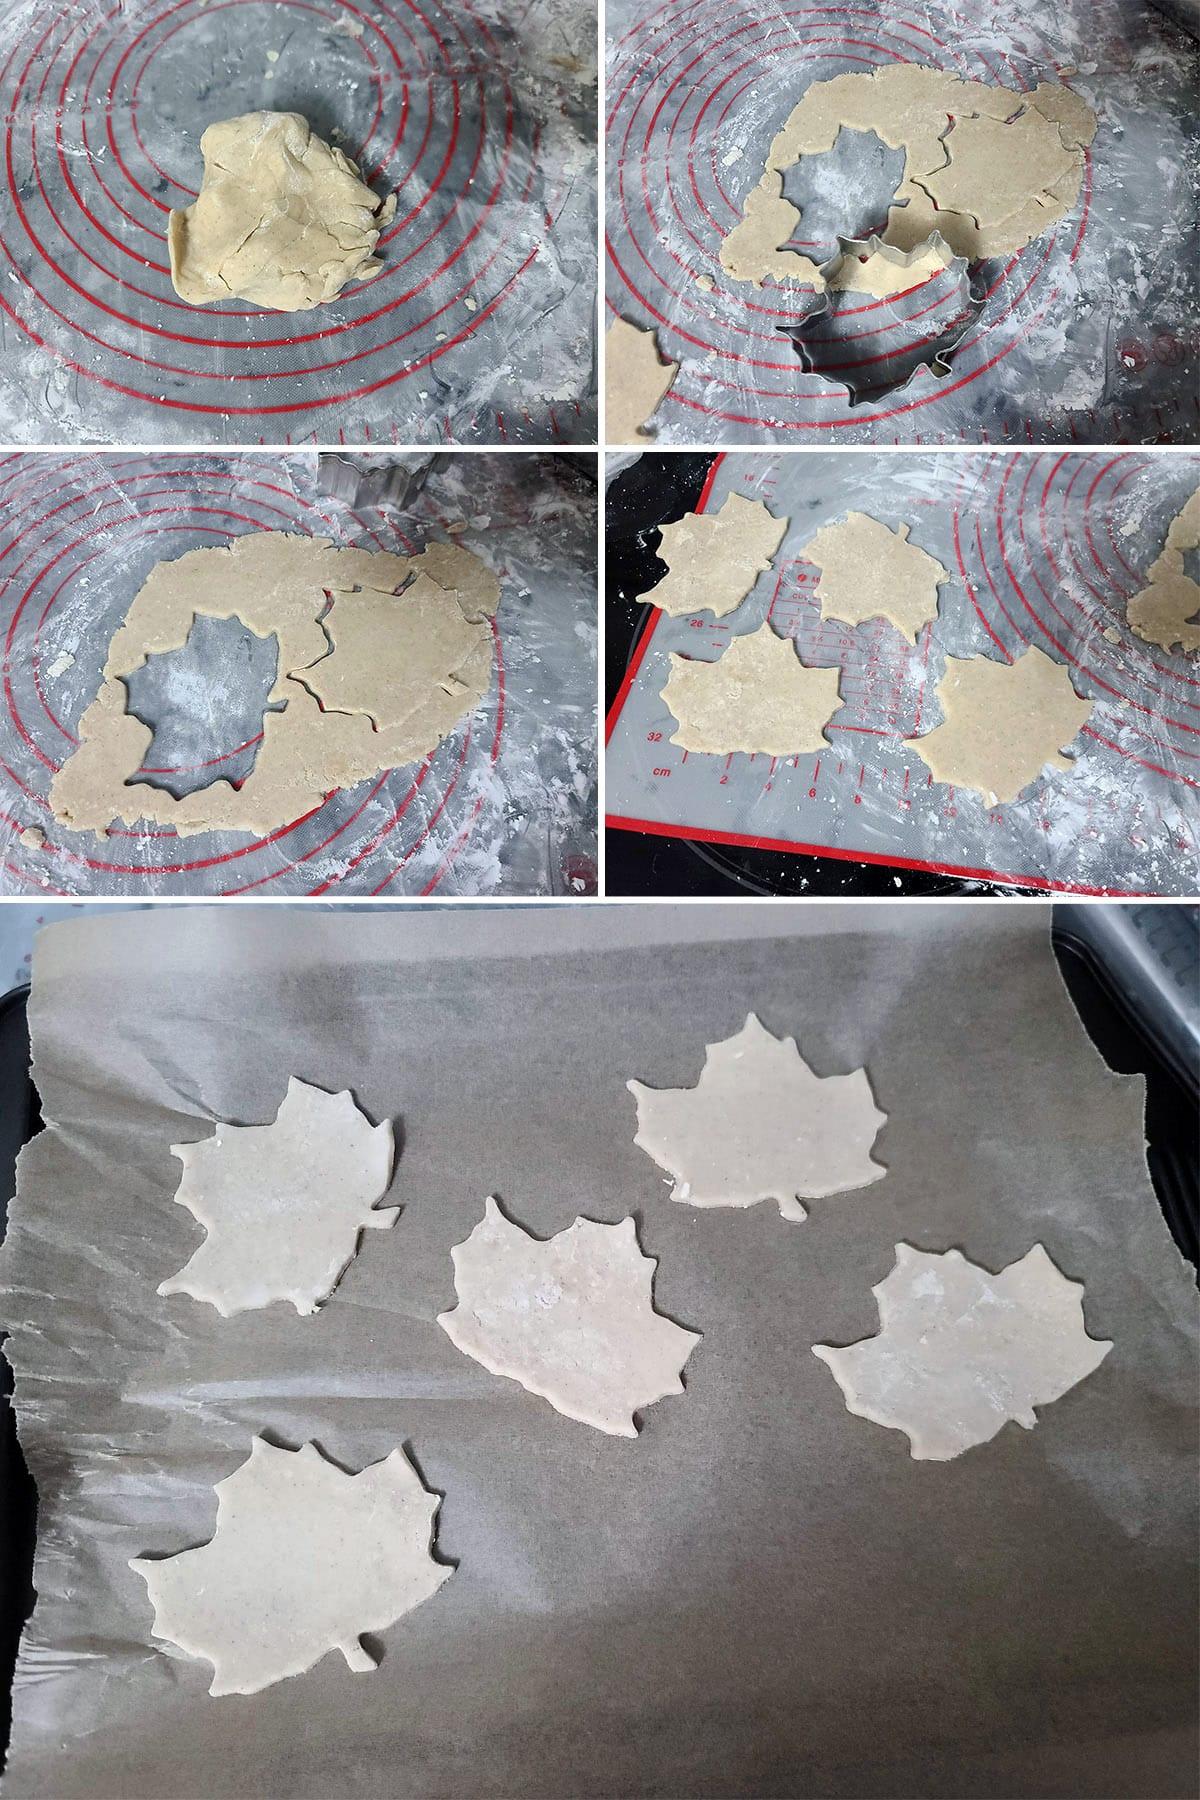
Baked Crust Garnish
Sometimes, you’ll want to bake top crust pieces separately, adding them after the pie has baked.
Any filling that is too liquid to support the weight of such pieces, should have them baked separately and placed afterwards.
For example?
I ALWAYS cut some pieces to decorate my pumpkin pies, as you never know when you’ll have cracks to cover!
To do this, line a baking sheet with parchment paper.
Gather leftover dough, gently ball it together, and roll out to ⅛" thickness, and carefully place cut pieces on the prepared cookie sheet.
Bake at whatever temperature your pie was baking at, for usually 10-15 minutes. Keep an eye on it - actual cooking time will depend on the temperature, and also the size of the pieces.
Once both the cake and “cookie” pieces are cool, arrange baked pieces on the surface of the pie as desired.
Crimping the Pie Crust
Crimping - or “fluting” - is what you do to seal the two crusts together (when applicable), and just deal with the excess bulk of dough in a pretty way.
Everyone has their own technique, so you may want to play around with it.
In my case, I lay the pointer and middle finger of my dominant hand on top of the edge of the pie, about a finger width apart - maybe slightly less.
I guess I’d say that the underside of my outermost knuckle is lined up with the edge of the pie crust.
Then, I bring my thumb up between the two fingers, from underneath the edge of the pie crust. This crimps the edge of the pie crust into sort of a wavy “W” type shape, in between the 3 fingers. Then, I crimp edges the whole way around the pie crust.
Prebaked Crust
Some recipes call for a prebaked crust - Usually if you’re doing a pie with a filling that doesn’t require baking*. In those cases, you’ll need to blind bake this crust.
Blind baking is when you construct your single pie crust (as directed above), then fill it with *something* before baking.
The idea is that the “something” takes the place of the filling - temporarily - to help the crust bake properly.
Without something doing that, your pie crust will behave weird - lots of obnoxious bubbles, the sides of the crust slipping down / shrinking, etc.
You can buy actual Pie Weights for this, or just use dried beans. Either way, you’ll line your constructed single crust pie with parchment paper or aluminum foil, and fill it up with whichever you’re using.
Just be sure to fill it right up to the edge of the pie pan, or you can get some shrinkage.
Roll, set, trim, and crimp the edge your pie as discussed earlier, then stick it in the freezer for 30 minutes.
Once it’s thoroughly chilled, preheat your oven to 375 F.
When the oven is ready, take the pie plate and crust out of the freezer, and line it with parchment or foil.
Fill the pie with beans or pie weights, right up to the edge of the pie plan.
See the pie recipe you’re using - generally speaking - you’re going to want the pie to cool to room temperature before filling it.
If you use it hot, you can trap the heat - as steam - under the filling, and end up with a soggy crust.
Personally, I like to - carefully - remove the lining and weights soon after the pie crust is removed from the oven.
While it’s easier - and a bit safer - to handle when it’s cool, the beans / weights can continue cooking the crust, as they can retain heat.
* Note: In other situations - like when dealing with a custard pie, or an especially juicy filling on a fruit pie - the recipe will have you pre-bake the crust as part of their instructions. When that’s the case, it can be because the filling requires less heat/time to cook properly than the crust will.
In those cases, you can follow the instructions on how to do a single crust pie - above - but you should follow the recipe’s directions for baking it, as it could be dependant on the needs of the filling.

Tips & Tricks for Using Gluten Free Pie Dough
Savory Pies
While I’ve pictured sweet pies throughout this post, you can also use this pie crust for savories, like a chicken pot pie - or my Savoury Alligator Pie.
I’ll usually cut the brown sugar out, and replace it with 1 teaspoon granulated sugar... but it’s not a super sweet crust, so you don’t really have to.
Flavour Variations
These crust recipes are fantastic as-is, but sometimes I’ll dress them up a little..
For spice pies - like my Gluten Free Apple Pie or Gluten Free Maple Pumpkin Pie - sometimes I’ll add ¼ teaspoon cinnamon and a pinch of nutmeg and cloves to the dry ingredients.
When I’m making a citrus pie - or citrus-adjacent, like my Gluten-Free Earl Grey Pie - sometimes I’ll add the zest of one orange, lemon, or lime.
Dairy Free and Vegan Pie Crust Options
For a dairy-free option, make the “Perfect Pie Crust” variation.
For a vegan pie crust, make the “Perfect Pie Crust”, but use vegetable shortening or vegan butter in place of the lard, along with whatever egg substitute you like working with.
Freezing Gluten-Free Pie Crust
Both of these recipes freeze well, so you can make them ahead and pull them out of the freezer as needed.
To freeze, flatten the dough piece(s) you won’t be using right away into a disk. Wrap tightly in plastic wrap, trying to exclude any trapped air.
Transfer wrapped dough ball(s) to a freezer bag, and remove most/all of the air from the bag.
Freeze for up to 3 months, taking out a crust or two as needed.
To use, let wrapped dough thaw in the fridge for a day, then use as directed above, or in the recipe you’re using.

The Parchment Paper Trick
Until fairly recently, I haven’t been fond of making pies, mostly because I hate SERVING them.
In theory, the butter / fats in the crust should be enough to self-grease the pan, allowing for an easy release.
Invariably, though, pie filling would seep down somehow, and basically glue the bottom of the crust to the pin tin.
Miserable.
For a 9-inch pie plate, I cut a round of parchment paper that’s 11 or 12" in diameter, then spray the pie plate with baking spray.
Then I center the parchment circle over the pan, and press it down into the bottom, smoothing any trapped air out of the sides. (The spray helps secure the paper to the plate!).
From there, I cut little slits from the outer edge of the parchment circle, down to the bottom edge of the inside of the pan. I’ll space them about 1.5" apart, to take out the excess fullness.
I lay all of the strips flat - slightly overlapping each other - and smooth everything out before adding the rolled pie dough.

It’s a great way to ensure that each slice comes out perfectly!
You can leave the parchment in, or carefully pull it out from under the pie, after the first slice is cut.

Handling
While developing gluten isn’t an issue with these recipe, you STILL don’t want to overwork the dough.
In this case, overworking the dough can prematurely emlt/soften the butter, distribute it throughout the dough, and not allow for air pockets to form - leading to a more dense crust.
So, handle the dough as little as possible, at every step after adding the water.
When you do add the water, gently mix it with a wooden spoon, rubber spatula, or by hand - not with a food processor or stand mixer.
After adding the water, don’t knead the dough, so much as gather it together.
When you roll dough out, make sure you’re starting with a clean surface, and dust that work surface with a little corn starch. This prevents sticking, which in turn prevents stretching.
You don’t want to use too much corn starch, though - it’ll dry your dough out and lead to overworking it. Use a little bit at a time, and re-dust as needed.
Also? Depending on the type of rolling pin you’re using, you might want to lightly dust THAT with flour as well.
Finally, when you’re putting the rolled dough into the pie plate - or transferring top crust pieces - try to handle it in a way that prevents the dough from stretching out of shape.
Chilling
Chilling is an important step in pie making, as it prevents the fat from melting prematurely, and just incorporating into the flour.
Yes, it’s ALL about those fat pockets!
So, chill your butter and cream cheese - or lard, depending on the recipe - ahead of time.
If you’re using a metal rolling pin, chilling it can help - the metal ones absorb heat from your hands, so best to start out cold.
On that note, have your pie filling made and chilled ahead of time, before you even roll out your crust.
If logistics mean rolling your bottom crust before getting the filling ready, keep the pie pan - and crust - in the fridge as you prepare that filling.
Honestly, you can’t really OVER chill the dough, especially after it’s been rolled/ set into the plate. When it doubt, throw it in the fridge for a while.
You want the fat in the crust as cold as possible, when it goes into the oven.
Egg Wash
For a shiny, golden brown finish to the top of your baked crust, I recommend doing an egg wash.
In a small bowl or mug, whisk together 1 large egg with a Tablespoon of heavy cream (or a tablespoon of cold water) until smooth.
Use a pastry brush to brush it over all of the exposed pie crust before putting the pie in the oven.
Important Note: If you’re doing a solid top crust, brush the egg wash on BEFORE cutting air vent slits. Egg brushed on after cutting them can seal them shut when baking.
Pie Shield
If you find the edges of your pie crust browning too fast, you can take the pie out and gently wrap it with foil. Return to the oven and continue baking as called for in the recipe.
Note: You can also buy silicone Pie Shields to do the same thing.
More Pie Recipes
Looking for some ideas on how to use this pie crust recipe? Here are a few gluten free recipes to try!
Caramel Apple Pie
Creamy Blueberry Amaretto Pie
Gluten Free Apple Pie
Gluten-Free Earl Grey Pie
Gluten Free Maple Pumpkin Pie
Partridgeberry Pie
Southern Comfort Peach Pie
Southern Comfort Pecan Pie
Savoury Alligator Pie

Share the Love!
Before you chow down, be sure to take some pics of your handiwork! If you post it to Bluesky, be sure to tag us - @CelebrationGen. We're also on Pinterest, so you can save all your favourite recipes to a board!
Also, be sure to subscribe to my free email newsletter, so you never miss out on any of my nonsense.
Finally, if you love this recipe, please consider leaving a star rating and a comment, and/or sharing this post on social media!

Gluten Free Pie Crust
Equipment
- Food Processor
Ingredients
Cream Cheese Version
- ¾ cup White Rice Flour
- ¾ cup Light Buckwheat Flour
- ½ cup Sorghum Flour
- ¼ cup Sweet Rice Flour
- ¼ cup Corn Starch
- 2 tablespoon Packed Brown Sugar
- 2 teaspoon Xanthan Gum
- ¼ teaspoon Salt
- 8 oz Brick Cream Cheese chopped
- ½ cup Unsalted butter cold and chopped
- ⅓ cup Cold Water
- 1 Large egg
“Perfect Pie Crust” Lard Version
- ⅓ cup Cold water
- 1 Large egg
- 1 teaspoon Vinegar
- ¾ cup Light Buckwheat Flour
- ¾ cup White Rice Flour
- ½ cup Sorghum Flour
- ¼ cup Sweet Rice Flour
- ¼ cup Corn Starch
- 2 tablespoon Packed Brown Sugar
- 1 teaspoon Xanthan Gum
- ¼ teaspoon Salt
- Pinch Baking powder
- 1 cup Lard
Instructions
Cream Cheese Version
- Measure flours, corn starch, brown sugar, xanthan gum, and salt into the bowl of your food processor, blitz to combine.
- Add cream cheese, blitz a few times until mixture resembles gravel.
- Add butter, ¼ cup water, and egg. Blitz a few more times - just long enough to start to bring it together as a dough – you may need to use a little more water. Do NOT over-process it!
- Remove dough from processor, knead lightly to bring it together as a ball. Wrap in plastic film, chill for 1 hour before use.
- Roll and bake, following specific pie recipe instructions.
“Perfect Pie Crust” Lard Version
- Whisk water, egg, and vinegar together, set aside.
- In a larger bowl, mix together flours, corn starch, brown sugar, xanthan gum, salt, and baking powder until well combined.
- Chop lard into smaller pieces, add to the bowl of dry ingredients.
- Using a fork, pastry blender, or your fingers, cut the lard into the dry ingredients, until it resembles a loose gravel.
- Add wet ingredients to the bowl of dry ingredients, mixing with a fork until just combined.
- Don’t over handle it. In Tom’s words, “Mix it with kindness"!
- Gather dough into a loose ball, divide into 2 equal balls. Wrap each with plastic wrap, and chill for 1 hour before using.
- Roll and bake, following specific pie recipe instructions.
Video
Notes
Nutrition
How to Make Flaky Gluten-Free Pie Crust
This is the pictorial walk through for the second pie crust, based on my Great Uncle Tom’s Perfect Pie crust.
It’s an all-lard pie crust recipe, passes for a gluten pie crust in taste and appearance... but is a bit fussier to work with.
The full recipe is in the recipe card above.
In a larger bowl, mix together flours, corn starch, brown sugar, xanthan gum, salt, and baking powder until well combined.
Chop lard into smaller pieces, add to the bowl of dry ingredients.
Using a fork, pastry blender, or your fingers, cut the lard into the dry ingredients, until it resembles a loose gravel.
Add wet ingredients to the bowl of dry ingredients, mixing with a fork until just combined.

Gather dough into a loose ball, divide into 2 equal balls. Wrap each with plastic wrap, and chill for 1 hour before using.
Roll and bake, following specific pie recipe instructions.


Can I use butter instead of lard?
Yes