

This Gluten Free Perogies recipe is one of my biggest "holy grail" gluten-free recipes ever. The dough behaves SO nicely, and the perogies are *legit*!
Originally posted on Dec 23, 2021. Updated on 4/27/2022

Gluten-Free Perogies.
Gluten-Free Pierogi.
Gluten-Free Varenyky
Whatever you call them - wherever you are - these were one of my big “holy grail” recipes, when I found out that I couldn’t handle gluten anymore.
Growing up, my grandmother used to make amazing perogies (Here's her Perogies Recipe!), and I’ve never forgotten that – pretty much everything else else pales in comparison!
... and I hear that a lot of people with celiac disease or finding themselves needing to follow a gluten-free diet have similar experiences with perogies.
Gluten-Free Perogies
I felt really daunted by the task of coming up with a great gluten-free perogies recipe.
As a Winnipegger, I KNOW good perogies, and I have really high expectations of how they have to be.
I was aiming to make the BEST gluten free perogies.
While the filling is gluten-free by default, that dough would take some doing.
For them to truly be "just as good as the real thing", it means that have to hold up against many different steps.
They had to roll well, fold well, hold up to boiling water, have the right texture after boiling.
They also had to have the right texture after pan frying (and hold up to that!), and - as a bonus - it would be great for them to hold up to deep frying, after the boil.
You know. A pretty tall order!

Success!
After some problem solving and experimentation, I did finally hit on the PERFECT gluten-free Pierogi recipe.
The dough ended up to be a wild success - working beautifully every step of the way: They boiled well, fried well, and taste amazing.
Of all the recipes in Beyond Flour 2, this gf pierogi recipe had the most colourful reaction to success.
It started out well - the dough rolled out paper thin, and provoked a Facebook status of "LOOK AT THE BEAUTIFUL DOUGH BEHAVING ITSELF BECAUSE IT KNOWS WHO IS BOSS HERE!"

Look at THAT!
I shrieked at my husband that he had to try them, there MAY have been a declaration of being "The Tony Stark of gluten-free"... a few excited expletives, a demand to play some AC/DC. yeah. COLOURFUL.
So yeah... they DEFINITELY live up to my high, Winnipeg perogy standards!
I have no words for how happy I am with the result. I probably jumped two feet in the air on first bite, and there was much arm flapping going on!
Deep Fried Gluten-Free Perogies
The perogies even passed my final "checkpoint" - they deep fry beautifully!
While deep frying isn’t a traditional preparation for perogies, they were a popular option at arenas back home. As a figure skater... competing at rinks that had them was always a treat, back in the day!
To deep fry these, let them dry a little after boiling. Fry them up at 375 until the skin browns and blisters, then serve immediately!
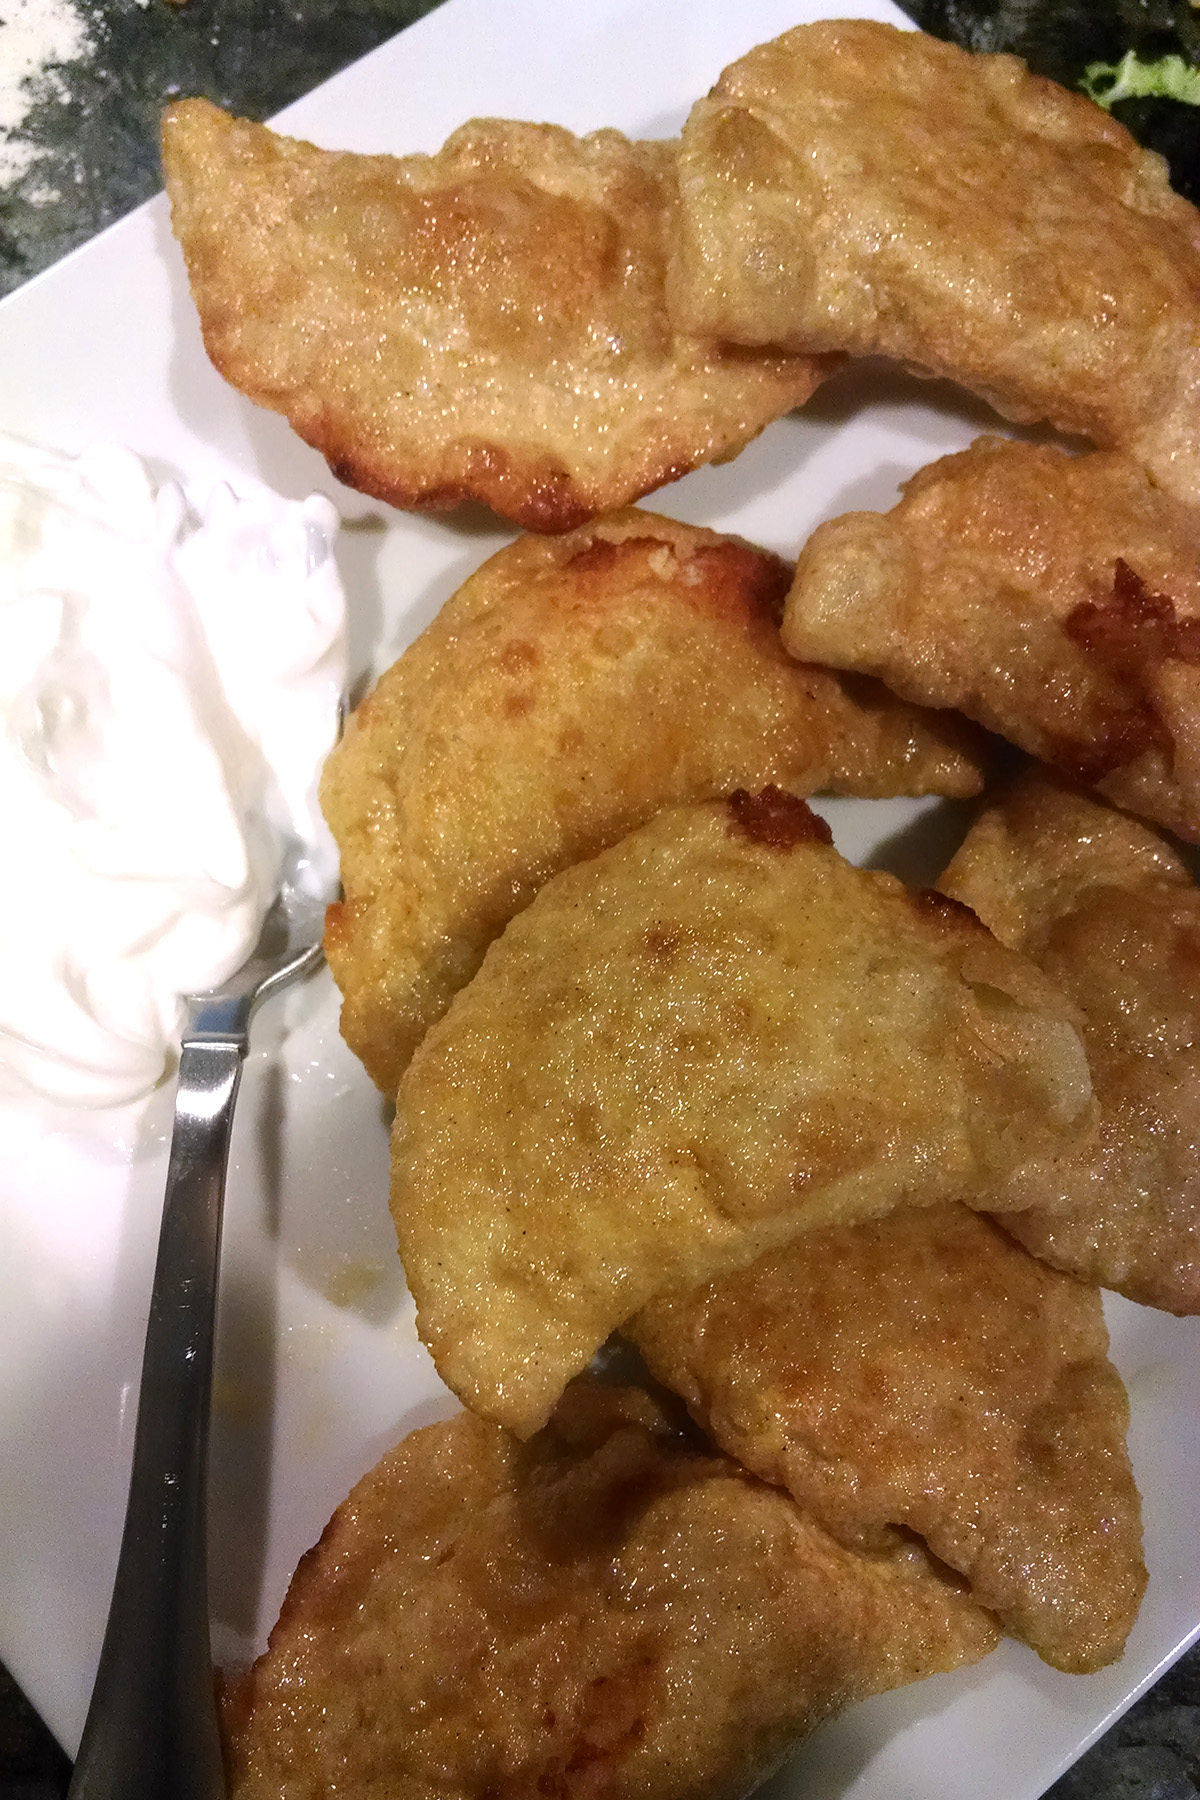
Deep fried gluten-free perogies!
A Note on The Photography
I was so excited about the way thing were going, I forgot to take photos of the process, after I rolled the dough out.
I DO have photos of the folding process, but they’re the full-gluten dough. I’ve included those photos in the pictorial walk-through, as the process is exactly the same.
Funny enough, we never took finished, professional photos of the full-gluten dough, so I’ve been using photos of the gluten-free perogies for THAT post. (Noted on that post, of course!)
Aside from a slightly different colour to the dough - the gluten free one being slightly darker, with some flecks in it - they really ARE that interchangeable!
Gluten-Free Pierogi Ingredients
Gluten-free Pierogi Dough
Like all of my flour-based recipes, my gluten-free dough was designed from scratch - using specific flours in appropriate proportions - rather than using an “all purpose” gluten-free flour mix.
I just find this to be the best way to do it, for consistent and predictable outcomes... as well as the best flavour and texture, closest to what you’d get from wheat flour!
For the specific gluten-free ingredients, I use:
Sorghum Flour
Tapioca Starch / Tapioca Flour
Potato Starch
Corn Starch
Sweet Rice Flour
Xanthan Gum
Sour cream
Large eggs
Warm milk
Vegetable oil
Salt
... and I recommend using a Rolling pin with adjustable thickness guides.
Basic Cheesy Potato Perogy Filling
Red potatoes
Sharp cheddar cheese
Sea salt
Black pepper
Gluten-Free Pierogi Filling Variations
One of the beautiful things about perogies is that you can customize your gluten free perogies in SO many ways.
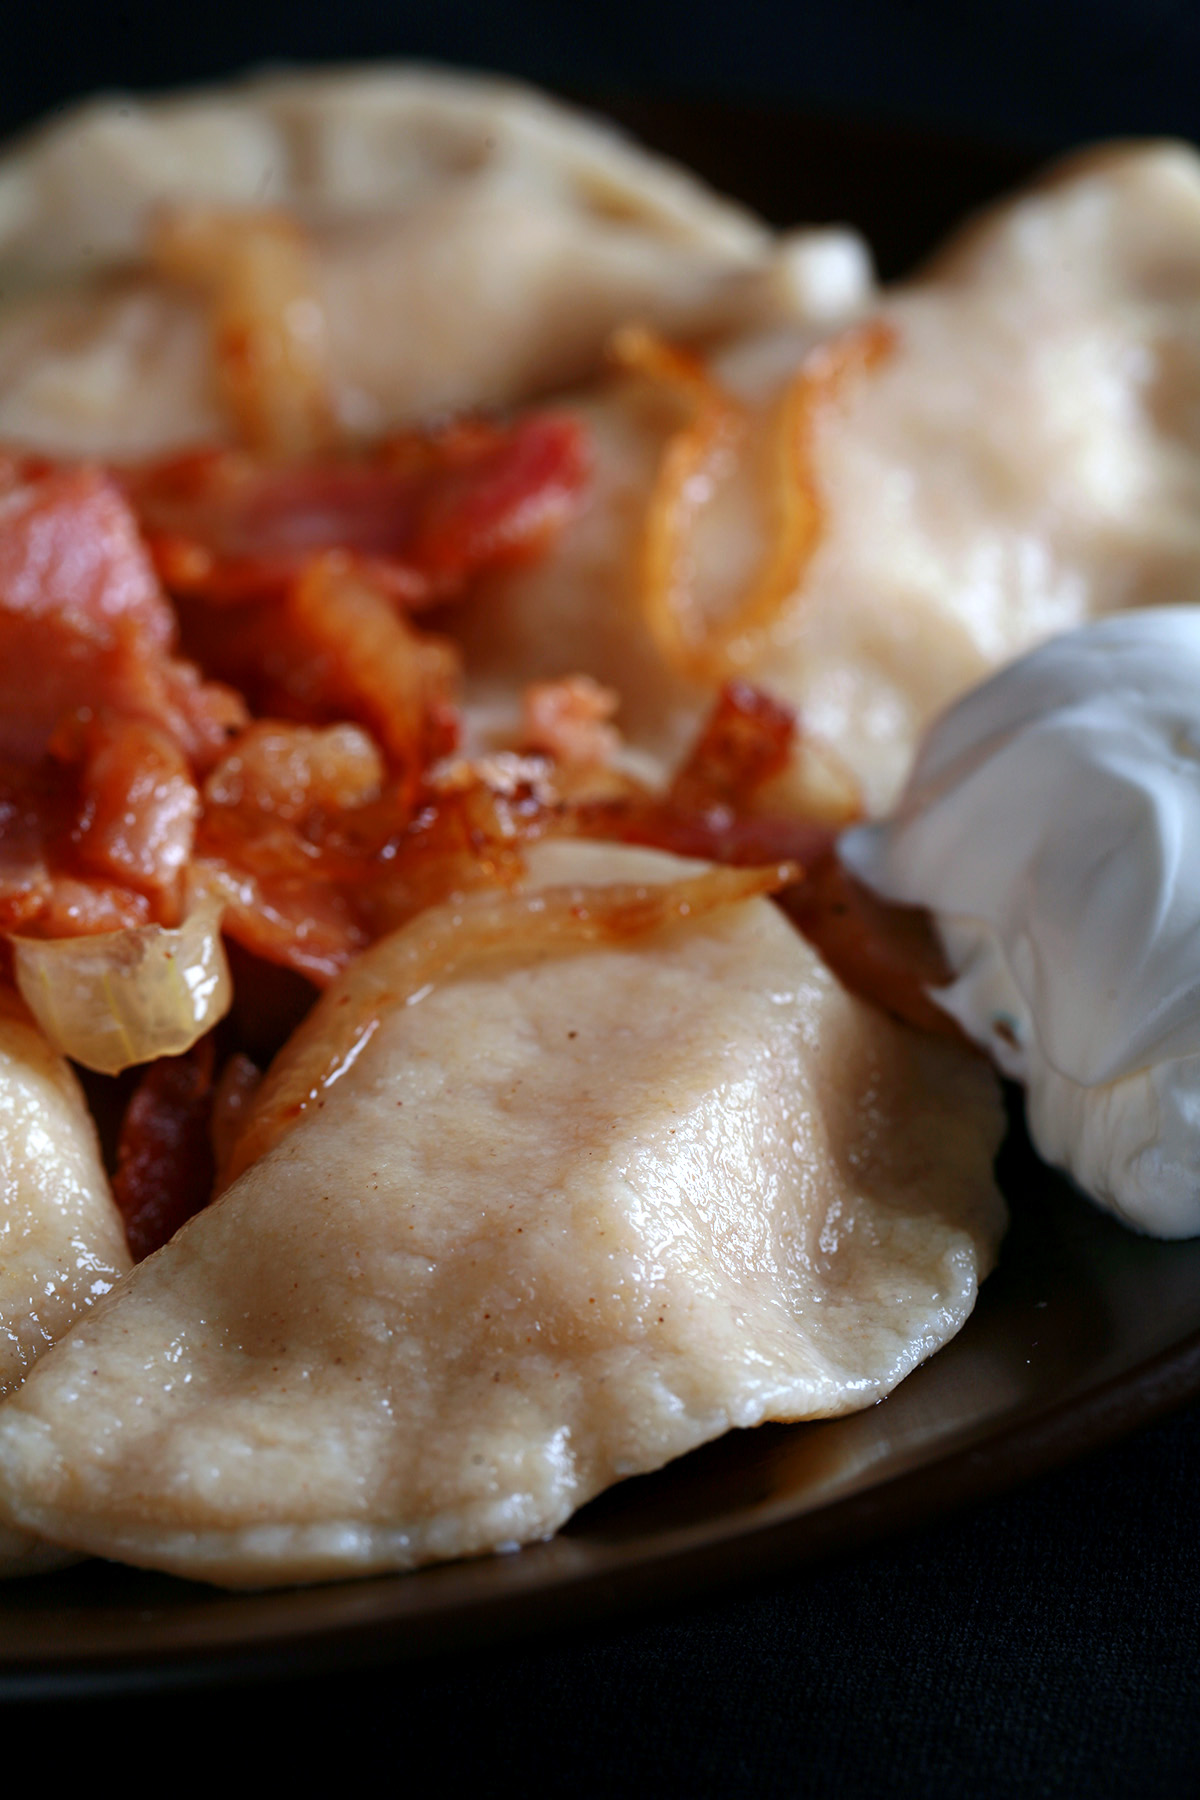
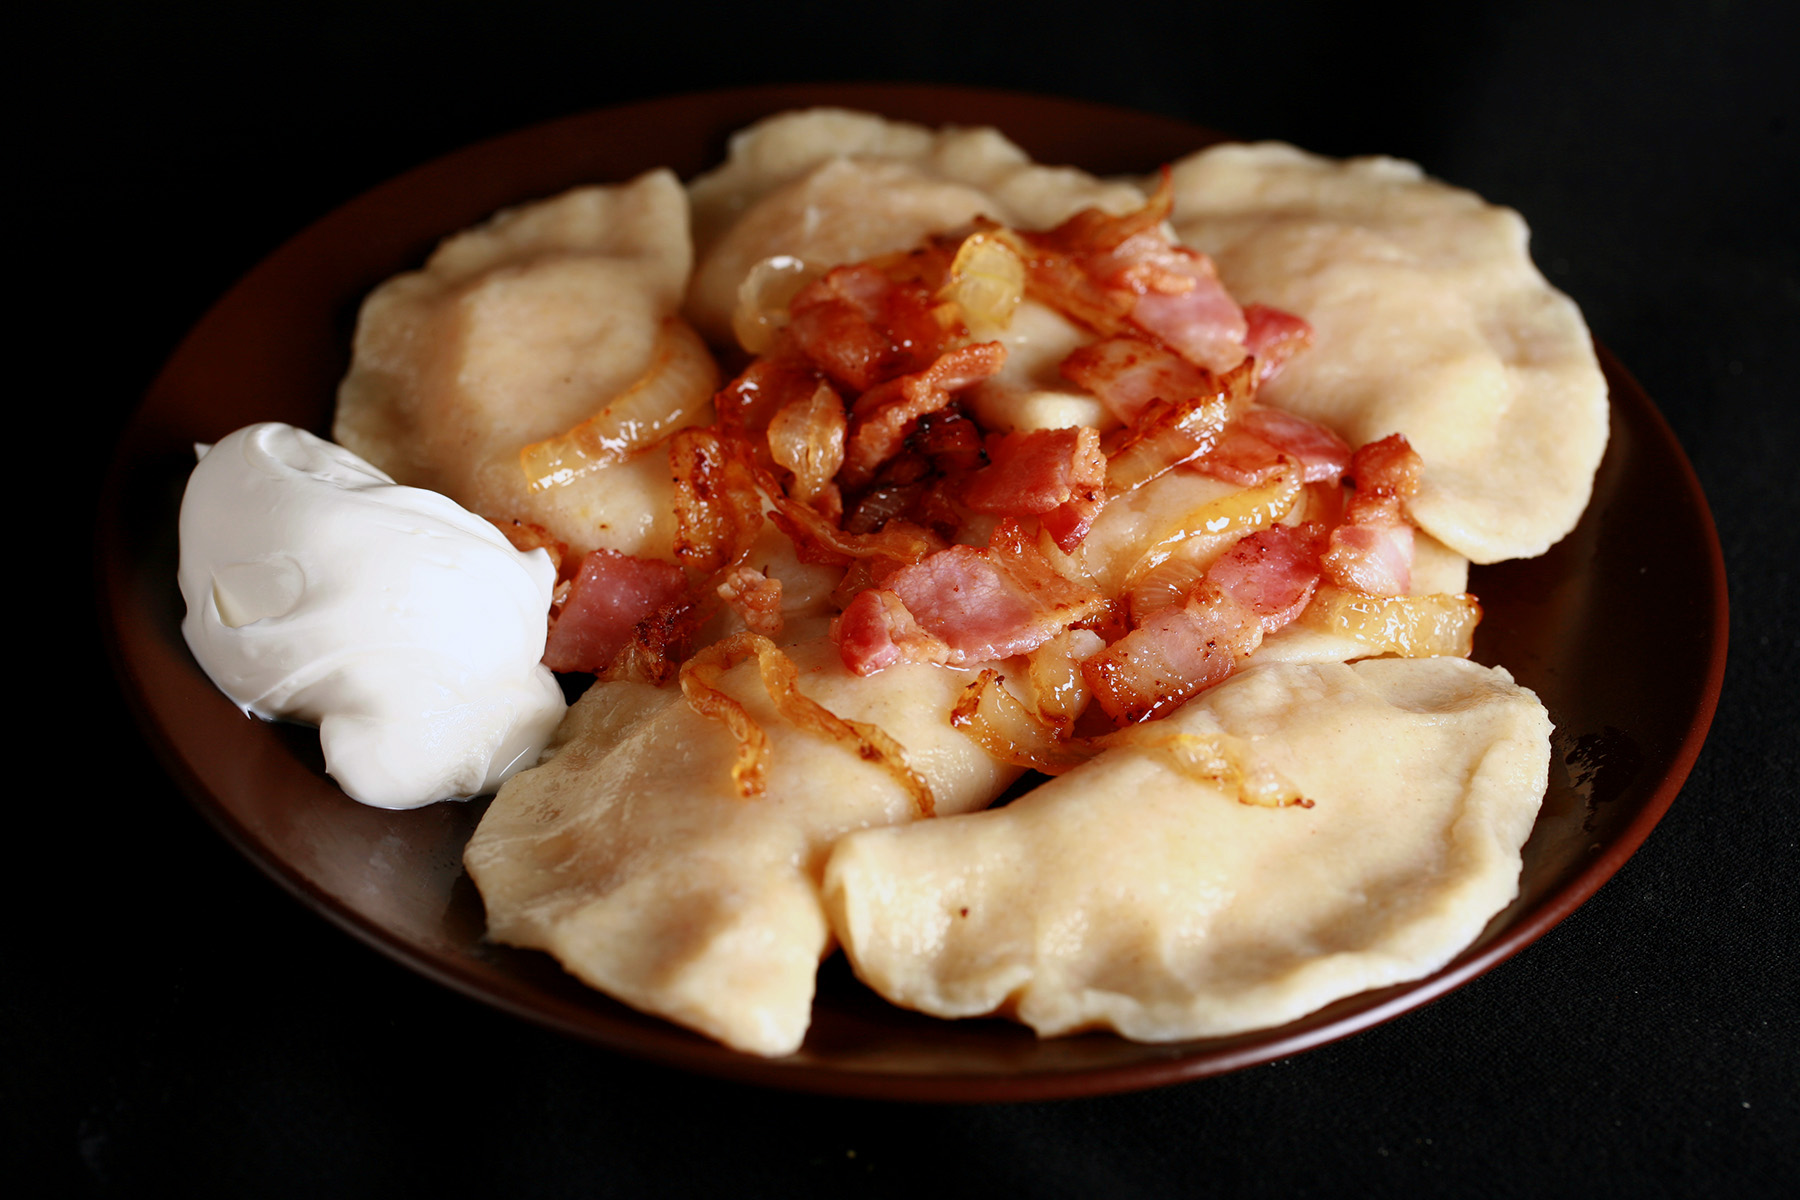
Potato and cheddar is most traditional, where I'm from... but you can add bacon, sauerkraut, dill, cottage cheese... in any combination.
If you want to try a different filling next time, here are a few options. Have fun with it!
Traditional: Sharp Cheddar cheese.
Onion, Bacon, and Cheese: ¾ lbs (375 g) cheddar cheese of your choice, ½ lb (250 g) crisp bacon (crumbled), chopped onion to taste.
Sauerkraut: Add ½ lb *250 g) sauerkraut to your potatoes. Cheese is optional – up to you!
Cottage Cheese, Onion, and Dill: ½ lb (250 g) well-drained cottage cheese, finely chopped onion and dill weed to taste.
Sweet Potato: Use roasted and mashed sweet potatoes instead of regular potatoes. Add some brown sugar and cinnamon - or other pie spices - if you like sweet fillings.
Keto Pierogi Soup: Ok, so it's not strictly a variation of this recipe, but it's too great not to share: Keto Pierogi Soup!
How to Make Gluten-Free Perogies
Full recipe follows at the end of this post, but here’s the pictorial overview with more detailed instructions and additional tips.
Prepare the Dough Recipe
In a food processor or stand mixer, blitz/beat sour cream, eggs, milk, and oil together until well combined.
In a separate mixing bowl, whisk together remaining ingredients (except potato starch) until well combined. Add to wet mixture, blitz/beat until a sticky dough comes together.
Wrap dough in plastic wrap, allow to rest on counter - at room temperature - for 45 minutes.
If you prefer, you can leave the dough in a large bowl and cover it with a LIGHTLY damp towel
While waiting, work on the filling:
Filling
In a large pot of water, boil potatoes until fork tender and ready to mash.
I like to use my stand mixer to mash my potatoes, and it works doubly well for this. You can, however, always mash and mix by hand.
Either way, mash potatoes until smooth, and mix in your choice of cheese and flavourings until well incorporated. Season with salt and pepper, to taste.

Gluten-free dough pictured!
Assembly:
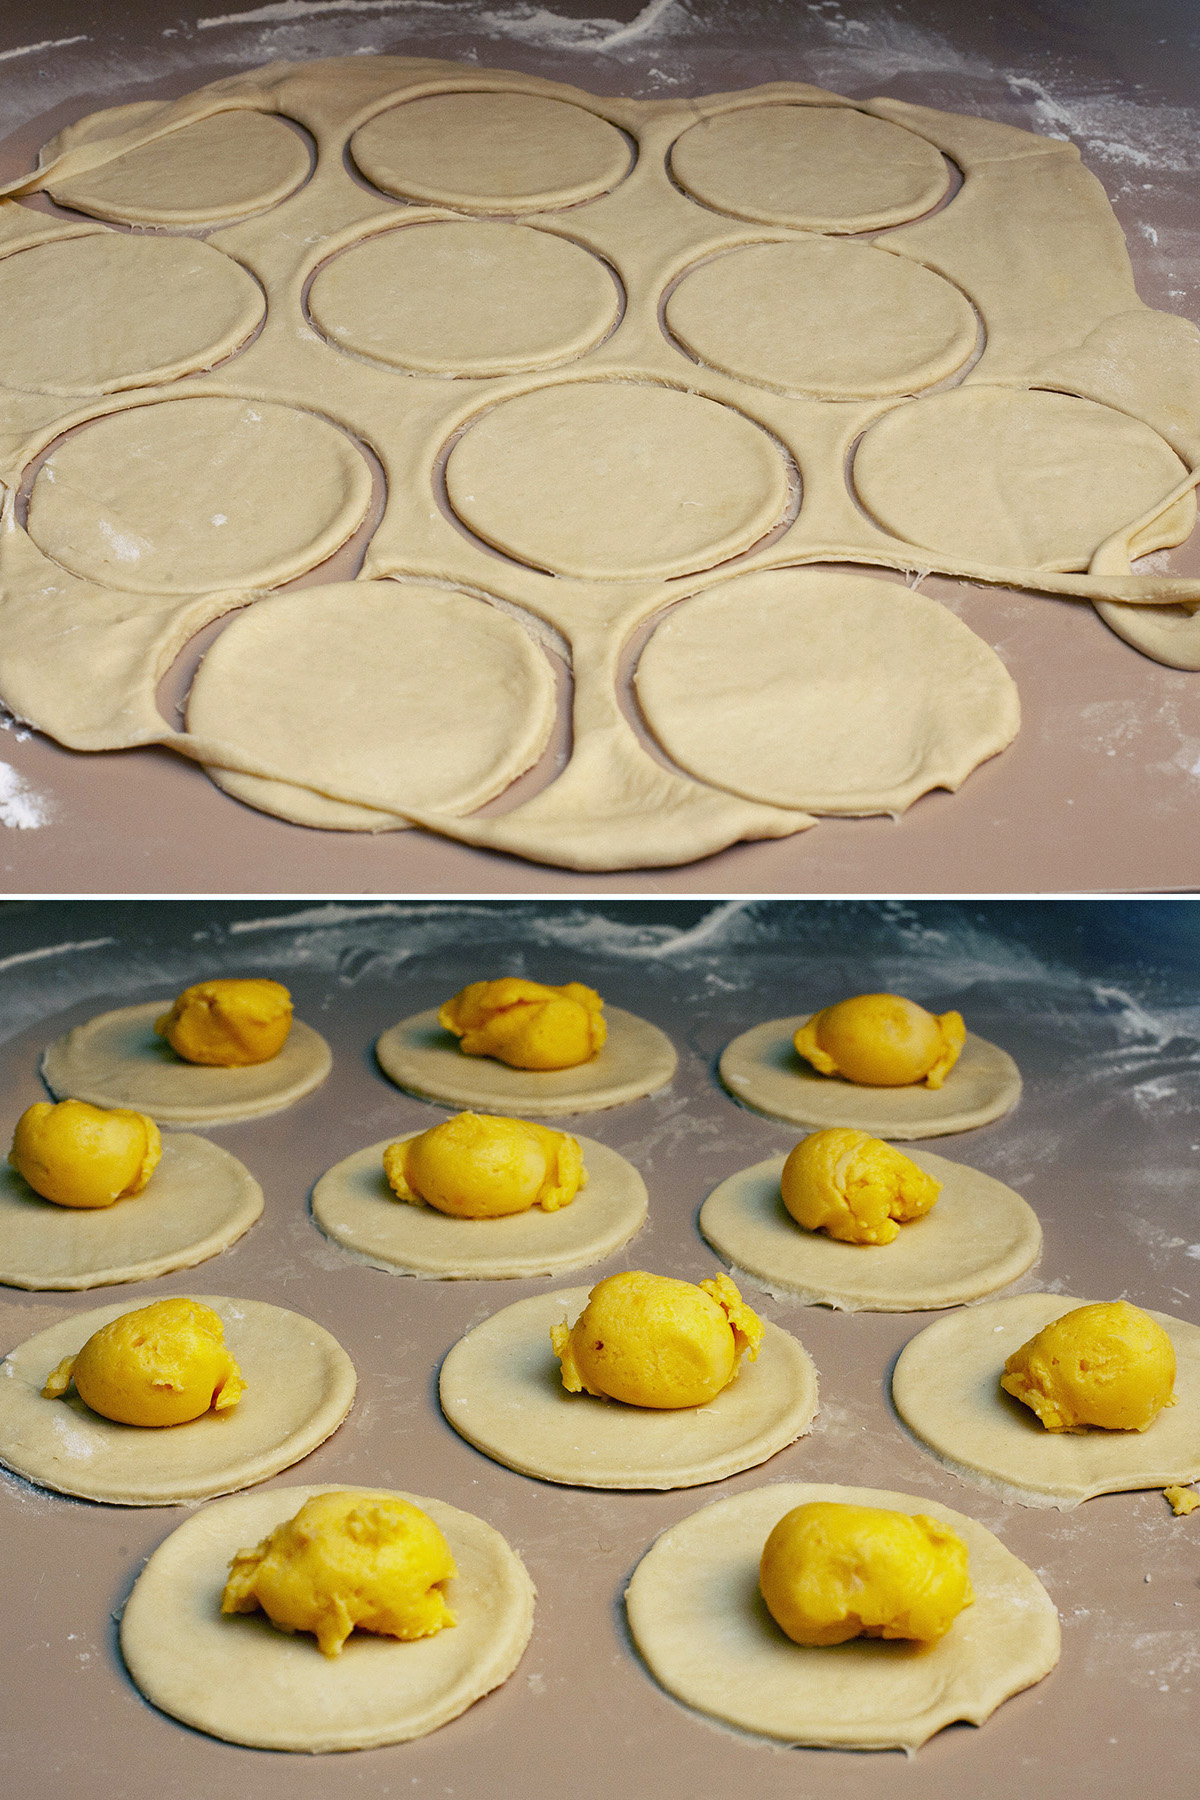
Dust clean work surface generously with potato starch. I like to lay down a silicone pastry mat first, to make clean up easier.
Roll out dough on the dusted surface, aiming to get it pretty thin – 1/16 – ⅛" of an inch or so.
When you’re first starting out, a bit thicker is ok – you’ll just have a bit more dough to bite through to get to your yummy filling!
Cut dough with large glass, biscuit cutter, or round cookie cutter – I like to use a glass that’s about 3" in diameter.
Place about 1 tablespoon of filling in the center of each of the circles of dough:
(Non-GF perogies photo being used for demonstration purposes!)
To save time, you can portion out the potato mixture and roll each into a small ball, and have them ready for putting on each dough round
Pick 1 round up in your non-dominant hand, and use your good hand to fold the dough around the filling, sealing the edge from one side to the other.
I usually stretch or roll the circles out to a slightly longer shape - sort of an oval shape - to better fold up over the potato balls.
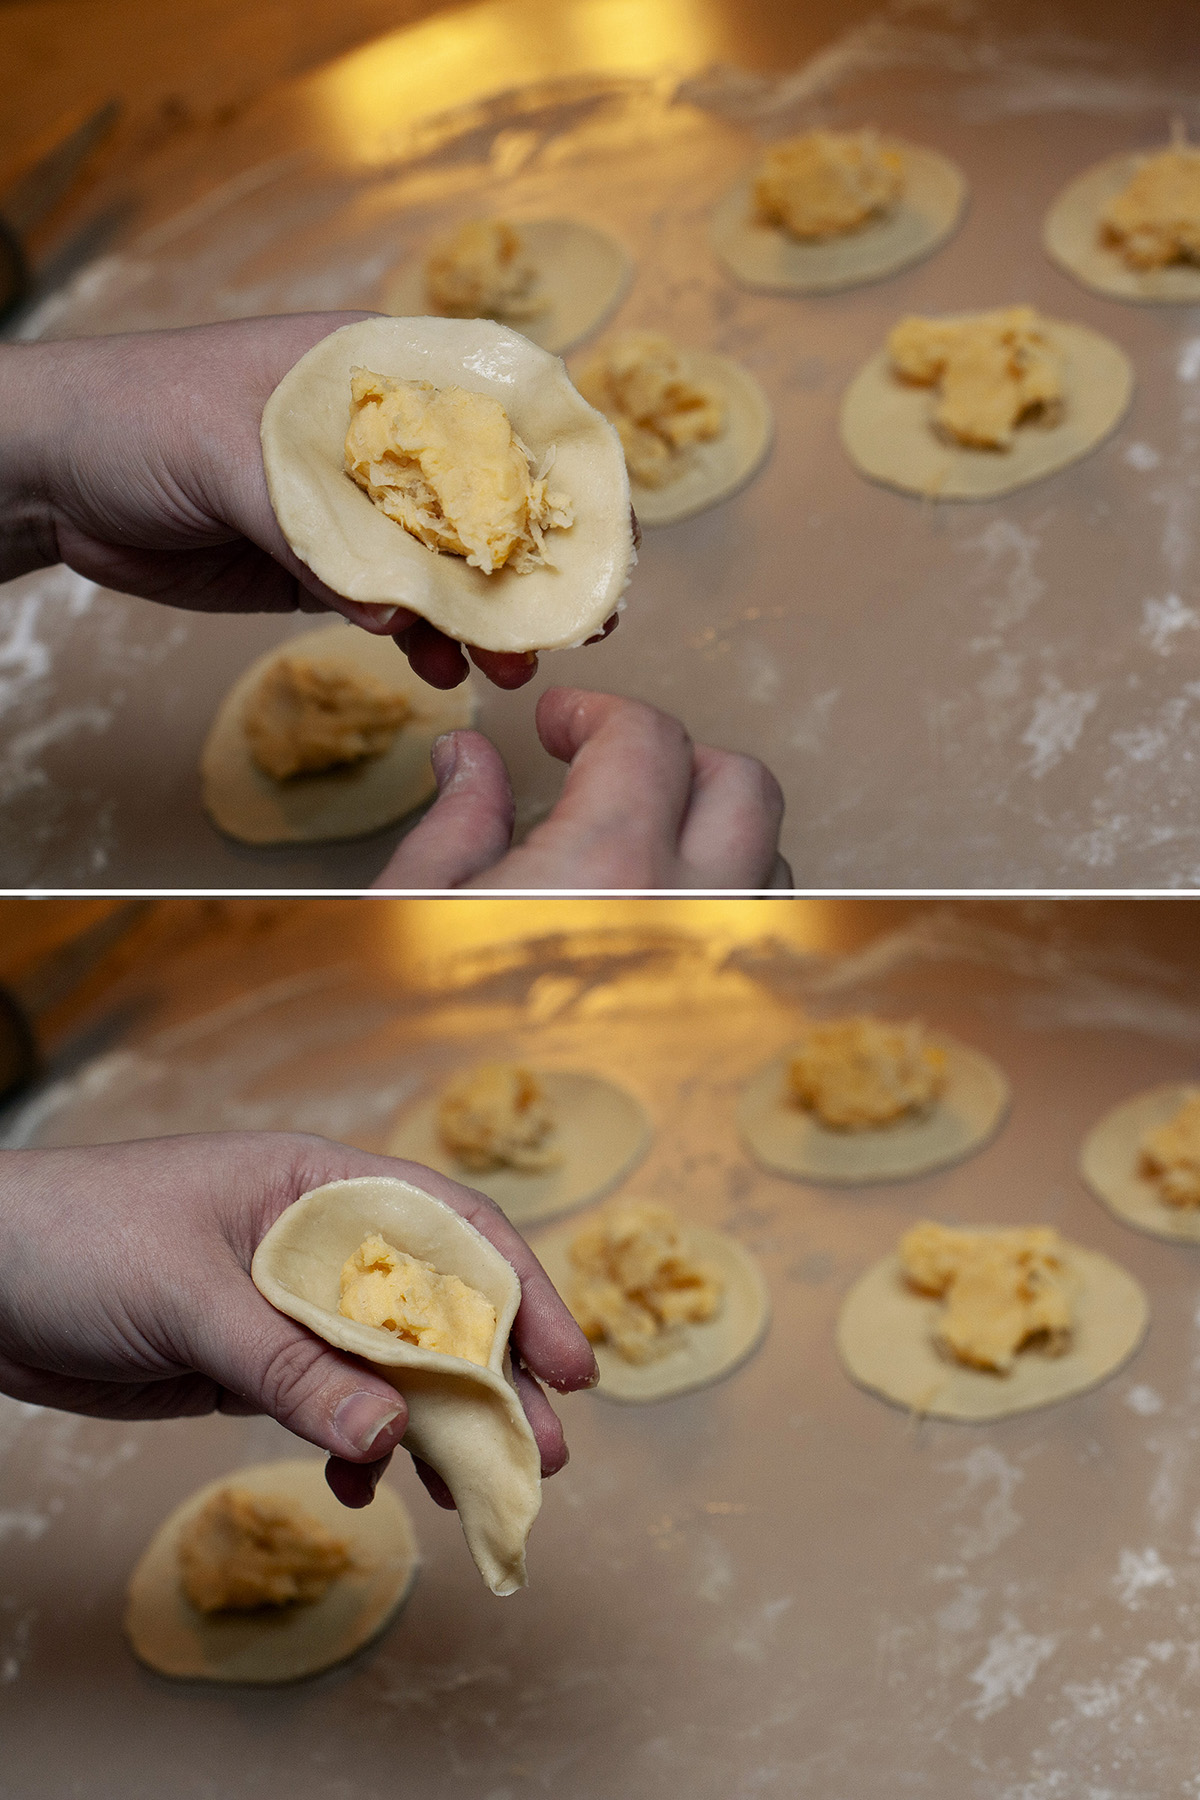
(Non-GF perogies photo being used for demonstration purposes!)
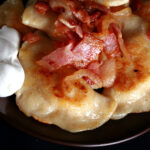
Make sure your formed pierogi are sealed well, or they will explode when you cook them! Also, I like to flatten them out a little.

(Non-GF perogies photo being used for demonstration purposes!)
Drop a few perogies at a time into the gently boiling water– our pot can take about a dozen.

(Non-GF perogies photo being used for demonstration purposes!)
Use a slotted spoon to remove cooked perogies from water, lightly toss with melted butter. This will prevent them from sticking together.

These ones are the gluten-free ones!
Enjoy as-is, or pan fry them in a nonstick frying pan with butter (or olive oil), onions.. maybe with some Kielbasa sausage… serve with some sour cream.. YUM!

Freezing Gluten-Free Perogies
Theoretically, you can freeze these (individually on a parchment lined cookie sheet, then bag them together when frozen)...
... but unless you make several batches (or don’t really like perogies!), they’ll never make it to the freezer.
Gramma’s Note on Forming Perogies
Grandma was very adamant that this is time-consuming (wasn’t really!), and that – rather than cutting the dough into rounds, taking the scraps, and re-rolling/cutting more – I should DEFINITELY use her technique.
I didn’t.
Sorry, gramma!
What she says you should do is this: Roll your dough out, and cut into 3" strips.
Cut those again into 3" squares, place filling in the middle, and fold/seal them to make triangles.
Yes, it would be quicker than the rounds – I just don’t have the big hatred for cutting rounds that she seems to!
More Gluten-Free International Recipes
Looking for more recipes with an international flair? I’ve got you covered...
Gluten Free Banana Nutella Ebelskivers
Gluten-Free Beef Stroganoff
Gluten Free Beet Gnocchi
Gluten-Free Chicken Pakora
Gluten Free Chicken Satay
Gluten-Free Gougeres
Gluten-Free Jamaican Beef Patties
Gluten Free Lemon Mascarpone Ebelskivers
Gluten-Free Mango Shrimp Spring Rolls
Gluten Free Mixed Vegetable Pakora
Gluten-Free Paneer Pakora
Gluten Free Paska
Gluten-Free Pasta Salad
Gluten Free Piroshki
Gluten-Free Ramen Recipe
Gluten-Free Samosa Recipe
Gluten Free Sopaipillas Pasadas
Gluten-Free Tempura

Share the Love!
Before you chow down, be sure to take some pics of your handiwork! If you post it to Bluesky, be sure to tag us - @CelebrationGen. We're also on Pinterest, so you can save all your favourite recipes to a board!
Also, be sure to subscribe to my free email newsletter, so you never miss out on any of my nonsense.
Finally, if you love this recipe, please consider leaving a star rating and a comment!
Gluten-Free Perogies [Gluten Free Pierogi]
Ingredients
Dough:
- 1 cup Sour cream
- 2 Large eggs
- ¼ cup Warm milk
- ¼ cup Vegetable oil
- 1 cup Sorghum flour
- ⅔ cup Tapioca starch
- ⅓ cup Corn starch
- ⅓ cup Sweet rice flour
- 2 teaspoon Xanthan gum
- ½ teaspoon Salt
- ⅓ cup Potato starch
Basic Filling:
- 1 ½ lbs Red potatoes peeled and quartered
- ½ - ¾ lb Cheddar cheese shredded
Instructions
Dough:
- In a food processor or stand mixer, blitz/beat sour cream, eggs, milk, and oil together until well combined.
- In a separate bowl, whisk together remaining ingredients (except potato starch) until well combined. Add to wet ingredients, blitz/beat until a sticky dough comes together.
- Wrap dough in plastic film, allow to rest on counter for 45 minutes. While waiting, work on the filling:
Filling:
- Boil potatoes until fork tender and ready to mash. I like to use my stand mixer to mash my potatoes, and it works doubly well for this. You can, however, always mash and mix by hand.
- Either way, mash potatoes until smooth, and mix in your choice of cheese and flavourings until well incorporated
Assembly:
- Dust clean work surface generously with potato starch. Roll out dough, aiming to get it pretty thin – 1/16 – ⅛" of an inch or so. When you’re first starting out, a bit thicker is ok – you’ll just have a bit more dough to bite through to get to your yummy filling!
- Cut dough with large glass or round cookie cutter – I like to use a glass that’s about 3" in diameter.
- Place about 1 tablespoon of filling in the center of each round.
- Lightly brush the edges with water, which will act as a glue.
- Pick 1 round up in your non-dominant hand, and use your good hand to fold the dough around the filling, sealing the edge from one side to the other. Make sure your perogies are sealed well, or they will explode when you cook them! Also, I like to flatten them out a little.
- Have a large pot of water heated to a low boil. (Too rough of a boil will rip your perogies apart!). Drop a few perogies in at a time – our pot can take about a dozen. Cook until all rise to the surface, then for 2-3 minutes longer.
- Removed cooked perogies from water, lightly toss with melted butter. This will prevent them from sticking together.
- Enjoy as-is, or fry them in butter, onions.. maybe with some Kielbasa sausage… serve with some sour cream.. YUM!


Thank you. I tried this recipe on the weekend and the perogies turned out fabulous! I'd never made perogies before. I was intimidated trying a GF dough for my first attempt but this was a delight. I was afraid that boiling them might destroy them. At the suggestion of my neighbour who helped, I steamed them in a large covered frying pan with a thin layer of water and some butter. After about 10 minutes, I uncovered them, let the water boil off then flipped them. They were delicious. I'm making another batch tomorrow. Thanks again.
Hello do you have the recipe for the non GF ones??
Sure:. https://celebrationgeneration.com/grandmas-perogie-recipe/
Thank you so much!!! 😀